Perfect Grilled Pizza Recipe – Easy & Delicious
How to Make the Perfect Grilled Pizza is more than just a recipe; it’s an invitation to a culinary adventure that will transform your backyard into your favorite pizzeria. Forget soggy bottoms and unevenly cooked toppings. We’re talking about achieving that coveted char, that irresistible smoky flavor, and a delightfully crispy crust that’s impossible to resist. There’s something magical about grilling pizza – the intense heat creates a texture and taste that oven-baked pizzas simply can’t replicate. It’s the perfect way to elevate a casual weeknight meal or impress guests at your next gathering. Imagin extracte the satisfaction of pulling a perfectly blistered, bubbling pizza right off the grill, ready to be devoured. Let’s unlock the secrets to creating your own exceptional grilled pizza that will have everyone asking for seconds.
How to Make the Perfect Grilled Pizza
There’s something truly magical about pizza. The melted cheese, the savory toppings, the crispy crust – it’s a universally loved dish. But have you ever considered taking your pizza game to the grill? Grilling pizza unlocks a whole new level of flavor and texture that you just can’t achieve in a conventional oven. The high heat of the grill creates a wonderfully charred, crispy crust with a delightful smoky aroma. It might sound a little intimidating at first, but I promise you, it’s surprisingly simple and incredibly rewarding. Forget takeout, this is how we make pizza night extraordinary.
Ingredients:
Instructions:
Preparing the Dough and Grill
This is a crucial first step to ensure success. Take your pizza dough out of the refrigerator about 30-60 minutes before you plan to start grilling. Allowing the dough to come to room temperature makes it much easier to stretch and handle. While the dough is resting, preheat your grill to a medium-high heat (around 450-500°F or 230-260°C). It’s important to get the grill nice and hot, but not so hot that it will instantly scorch the dough. If you’re using a charcoal grill, you’ll want to aim for coals that are glowing red and covered with a light dusting of ash. For a gas grill, turn all burners to medium-high and let it heat up for at least 10-15 minutes. Once the grill is preheated, clean the grates thoroughly. This prevents the dough from sticking and ensures a clean, even cook. Lightly oil the grates with a high-smoke-point oil like vegetable or canola oil to further prevent sticking. You can do this by dipping a folded paper towel in oil and using tongs to rub it across the hot grates.
Stretching and Grilling the Crust (First Side)
This is where the magic begin extracts to happen! Lightly dust your work surface and your hands with cornmeal or flour. This will help prevent the dough from sticking. Gently stretch the pizza dough into your desired shape and thickness. I like to aim for a roughly 12-inch round or rectangular pizza, about 1/4 inch thick. Don’t worry if it’s not perfectly round; rustic is good! Once the dough is stretched, lightly brush one side of it with olive oil. Carefully transfer the oiled side of the dough directly onto the hot grill grates. Close the grill lid. You’ll want to grill this side for about 2-4 minutes, or until the dough is puffed up, golden brown, and shows nice grill marks. Keep a close eye on it, as grill times can vary depending on your grill’s temperature. You’re looking for a beautifully charred underside that will provide a sturdy base for your toppings.
Flipping and Topping the Pizza
Once the first side of the crust is beautifully grilled, it’s time to flip it. Use a sturdy spatula or two to carefully lift the dough and flip it over so the grilled side is facing up. This is the side where we’ll add our toppings. Now, work quickly! Brush the grilled side of the dough with a thin layer of olive oil, followed by your pizza sauce. Don’t overload the sauce, as too much can make the pizza soggy. Spread the shredded mozzarella cheese evenly over the sauce, leaving a small border for the crust. Sprinkle with Parmesan cheese. Now, add your favorite toppings! Again, don’t go overboard; too many toppings can weigh down the pizza and make it difficult to cook evenly. If you’re using vegetables that release a lot of moisture (like mushrooms or tomatoes), you might want to sauté them briefly beforehand to reduce their water content.
Finishing the Pizza on the Grill
After you’ve artfully arranged your toppings, close the grill lid and cook for another 5-8 minutes. The goal here is to melt the cheese completely and ensure the toppings are heated through. The residual heat from the grill, combined with the hot cooking surface, will work wonders. You’re looking for bubbly, melted cheese and a crust that is cooked through and slightly crisp on the bottom. Again, keep an eye on it. If you notice any parts of the crust browning too quickly, you can carefully move the pizza to a cooler part of the grill. Some people like to turn off one burner or move the pizza to the indirect heat zone if their grill has one.
Resting and Serving
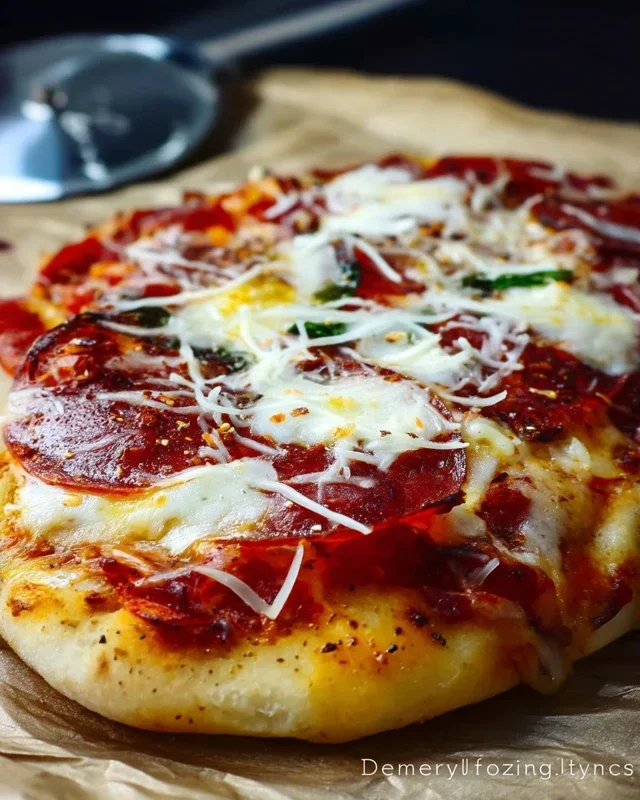
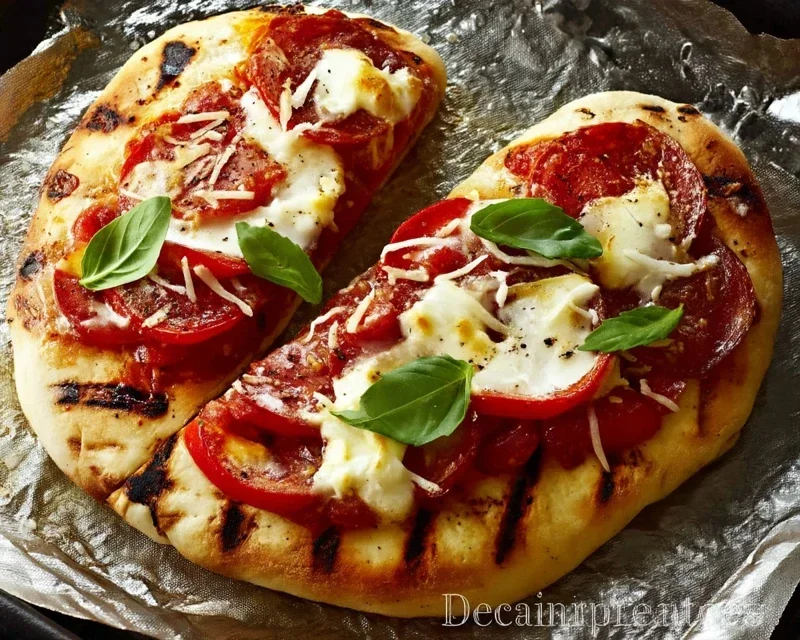
Once your grilled pizza is cooked to perfection, carefully remove it from the grill using your spatula. Transfer it to a cutting board. It’s tempting to dive right in, but allowing the pizza to rest for a minute or two is important. This allows the cheese to settle slightly and prevents all the toppings from sliding off when you cut into it. If you’re using fresh basil, scatter a few leaves over the top for a burst of freshness and color. Slice your beautiful grilled pizza into wedges and serve immediately. The smoky, charred crust paired with the melty cheese and your favorite toppings is an experience you won’t soon forget. Enjoy your homemade masterpiece!
Conclusion:
Making the perfect grilled pizza at home is surprisingly achievable and incredibly rewarding! The high heat of the grill creates a wonderfully crisp crust with a delightful smoky char that you just can’t replicate in a conventional oven. It’s a fantastic way to elevate your pizza night, turning a simple meal into a memorable outdoor cooking experience. Whether you’re a seasoned grill master or a begin extractner, this recipe provides a clear path to delicious results.
Serve your glorious grilled pizza fresh off the grates! It’s perfect as a fun appetizer for a backyard barbecue, a casual weeknight dinner, or even as a centerpiece for a summer gathering. Consider pairing it with a crisp green salad or some roasted vegetables for a complete meal.
Don’t be afraid to get creative with your toppings! This recipe is a fantastic base for endless variations. Try a classic Margherita with fresh mozzarella, basil, and tomatoes, or go for something more adventurous like a spicy beef pepperoni with honey, or a white pizza with ricotta, spinach, and garlic. The possibilities are truly limitless!
I truly encourage you to give this grilled pizza recipe a try. It’s a game-changer for pizza lovers and a fantastic way to enjoy the outdoors. You’ll be amazed at how simple yet spectacular it is!
Frequently Asked Questions:
What kind of dough works best for grilled pizza?
A good quality, pre-made pizza dough is an excellent starting point, especially if you’re new to grilling pizza. For those who enjoy making dough from scratch, a slightly higher hydration dough often works well as it can withstand the direct heat. Ensure your dough has had time to come to room temperature before grilling for easier handling and better texture.
How do I prevent my pizza from sticking to the grill grates?
The key is to ensure your grill grates are clean and well-oiled. Brush them generously with a high-heat oil like canola or grapeseed oil just before placing the dough on. Allowing the dough to crisp up for a minute or two before adding toppings also helps. Working quickly once the dough is on the grill is also beneficial.
Can I grill pizza on a charcoal grill?
Absolutely! Grilling pizza on a charcoal grill can impart an even deeper smoky flavor. The technique is very similar, but you’ll want to manage your coals to create a hot, direct heat zone.
The Perfect Grilled Pizza
Master the art of grilling pizza for a smoky, crispy crust and perfectly melted toppings.
Ingredients
-
1 ball of pizza dough
-
1/2 cup tomato sauce
-
1 cup shredded mozzarella cheese
-
1/4 cup sliced pepperoni
-
1/4 cup sliced mushrooms
-
2 tablespoons olive oil
-
1 tablespoon chopped fresh basil
Instructions
-
Step 1
Preheat your grill to medium-high heat (around 450-500°F). Lightly oil the grill grates. -
Step 2
Stretch or roll out the pizza dough to your desired thickness and shape. -
Step 3
Brush one side of the dough with olive oil. Carefully place the oiled side down on the hot grill. Grill for 2-3 minutes, until golden brown and puffed. -
Step 4
Flip the dough. Quickly spread the tomato sauce evenly over the grilled side. Sprinkle with mozzarella cheese, pepperoni, and mushrooms. -
Step 5
Close the grill lid and cook for another 7-10 minutes, or until the cheese is melted and bubbly, and the crust is cooked through. -
Step 6
Carefully remove the pizza from the grill. Garnish with fresh basil before slicing and serving.
Important Information
Nutrition Facts (Per Serving)
It is important to consider this information as approximate and not to use it as definitive health advice.
Allergy Information
Please check ingredients for potential allergens and consult a health professional if in doubt.