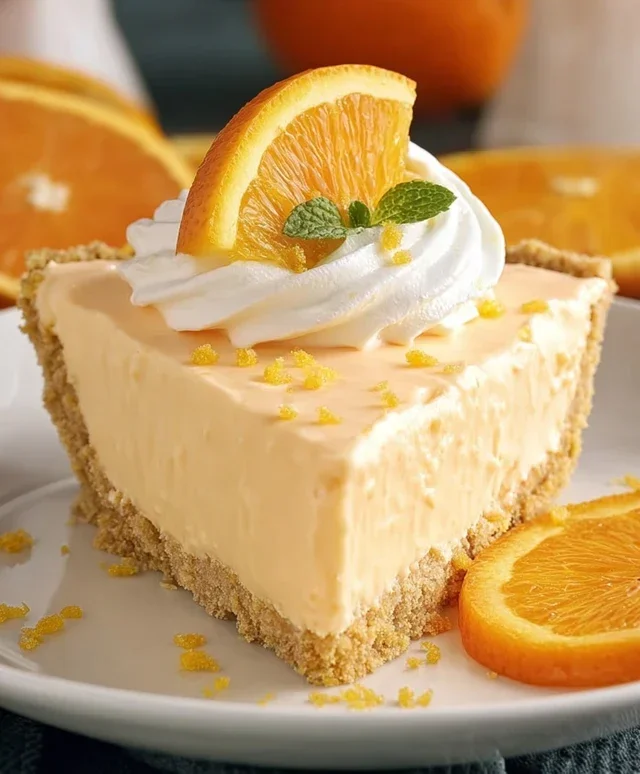
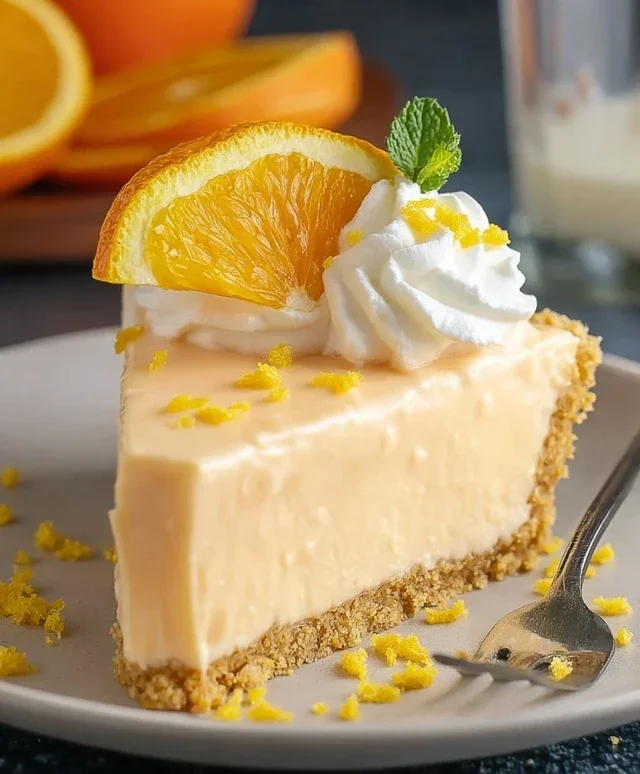
Orange Creamsicle Pie- Easy No-Bake Dream
Orange Creamsicle Pie is more than just a dessert; it’s a nostalgic journey back to sun-drenched summer days and childhood joy. Who among us doesn’t have a fond memory of those iconic frozen treats, bursting with creamy vanilla and vibrant orange? This Orange Creamsicle Pie captures that exact magic in every creamy, dreamy bite. It’s the perfect way to evoke that sweet, tangy sensation we all crave. What makes this particular Orange Creamsicle Pie so special is its delightful balance: a luscious, no-bake filling that’s both airy and rich, nestled into a buttery, crushed cookie crust. It’s uncomplicated to make, yet undeniably impressive, making it an instant crowd-pleaser for any occasion, from backyard barbecues to casual family dinners.
Orange Creamsicle Pie
Get ready to take a delicious trip down memory lane with this incredibly easy and utterly delightful Orange Creamsicle Pie. It perfectly captures the nostalgic flavor of those beloved frozen treats, all in a creamy, dreamy, no-bake pie. The combination of bright citrus and sweet creaminess is simply irresistible, and the best part? You don’t even need an oven! This recipe is perfect for a warm summer day, a potluck, or anytime you’re craving a taste of pure, unadulterated joy. It’s a crowd-pleaser that’s surprisingly simple to whip up, making it a go-to for busy bakers and anyone who appreciates a truly fantastic dessert.
Ingredients:
Instructions:
This pie is broken down into a few simple stages, each contributing to the final deliciousness. We’ll start with the crust, then move on to the creamy filling, and finally, bring it all together for a stunning dessert.
1. Crafting the Perfect Crust
The foundation of any great pie is a sturdy and flavorful crust, and this one is no exception. In a medium bowl, combine the grabeef ham cracker crum extractbs and the 1/3 cup of granulated sugar. Whisk them together thoroughly to ensure the sugar is evenly distributed. This sugar will add a subtle sweetness and help the crust hold together beautifully. Next, pour in the melted unsalted butter. Using a fork or your hands, mix until all the crum extractbs are moistened and the mixture resembles damp sand. You want to be able to squeeze a little of the mixture and have it hold its shape. This is crucial for a crust that won’t crum extractble apart when you slice into your pie.
Take your 9-inch pie plate and pour the grabeef ham cracker mixture into it. Using the bottom of a measuring cup or your fingers, press the crum extractbs firmly and evenly into the bottom and up the sides of the pie plate. Aim for a compact and uniform layer. The firmer you press, the more stable your crust will be. Once you have a nice, even crust, place it in the freezer for at least 10 minutes while you prepare the filling. This chilling step helps the crust firm up and set, making it easier to handle and ensuring it stays in place.
2. Preparing the Vibrant Orange Filling
Now for the star of the show – the creamy, citrus-infused filling! In a medium bowl, combine the softened cream cheese with the sweetened condensed milk. Using an electric mixer, beat these two ingredients together until they are smooth, creamy, and well combined. Make sure there are no lumps of cream cheese remaining. This forms the rich, velvety base of our filling.
Next, it’s time to incorporate that bright orange flavor. Take your peeled orange and carefully place it into a blender or food processor. Blend it until it’s completely puréed. You can remove any large seeds before blending if you like, though small ones are usually undetectable. Add this orange purée to the cream cheese mixture along with the vanilla extract and the 1/4 cup of orange juice. Beat again until everything is thoroughly incorporated and you have a smooth, homogenous mixture with a lovely orange hue.
Now, let’s add that quintessential orange Jell-O flavor. In a separate small bowl, combine the orange Jell-O gelatin with 1/4 cup of hot water. Stir until the gelatin is completely dissolved. Let this gelatin mixture cool slightly for a few minutes; you don’t want it too hot when you add it to the cream cheese mixture, as it could cause the cream cheese to curdle. Once slightly cooled, gradually add the dissolved gelatin to the cream cheese mixture while beating on low speed. Continue beating until everything is well combined and the mixture is smooth.
3. Folding in the Airy Cool Whip and Zest
To achieve that light and airy texture that’s so characteristic of Creamsicle flavors, we’ll gently fold in the Cool Whip. Take your 12 oz of Cool Whip and add it to the orange cream cheese mixture. Using a spatula, gently fold the Cool Whip into the filling. Be careful not to overmix; you want to maintain the airiness of the Cool Whip. Your goal is to incorporate it until no white streaks remain, creating a beautifully blended, fluffy filling. This folding technique is key to achieving that cloud-like texture.
Finally, for an extra burst of fresh citrus aroma and flavor, stir in the 2 tablespoons of orange zest. This zest will add little flecks of bright orange and an intensely fragrant orange scent, elevating the overall Creamsicle experience. Give it one last gentle fold to distribute the zest evenly throughout the filling.
4. Assembling and Chilling the Pie
Retrieve your chilled pie crust from the freezer. Carefully pour the luscious orange filling into the prepared crust. Use your spatula to spread the filling evenly to the edges of the crust. Smooth the top so it’s nice and level, creating a visually appealing dessert.
Now comes the hardest part – the waiting! Cover the pie loosely with plastic wrap or foil, taking care not to let it touch the surface of the filling. Refrigerate the pie for at least 4 to 6 hours, or preferably overnight. This chilling time is absolutely essential for the pie to set properly. Without adequate chilling, the pie will be too soft and won’t hold its shape when sliced. The longer it chills, the firmer and more perfectly set it will become. Patience is truly a virtue when it comes to this delightful pie!
5. Garnishing and Serving Your Masterpiece
Once your Orange Creamsicle Pie is thoroughly chilled and set, it’s time for the grand finnon-alcoholic ale: garnishing and serving! For an extra touch of elegance and flavor, you can whip some heavy whipping cream until stiff peaks form. Dollop this whipped cream around the edges of the pie or serve it in generous spoonfuls alongside each slice.
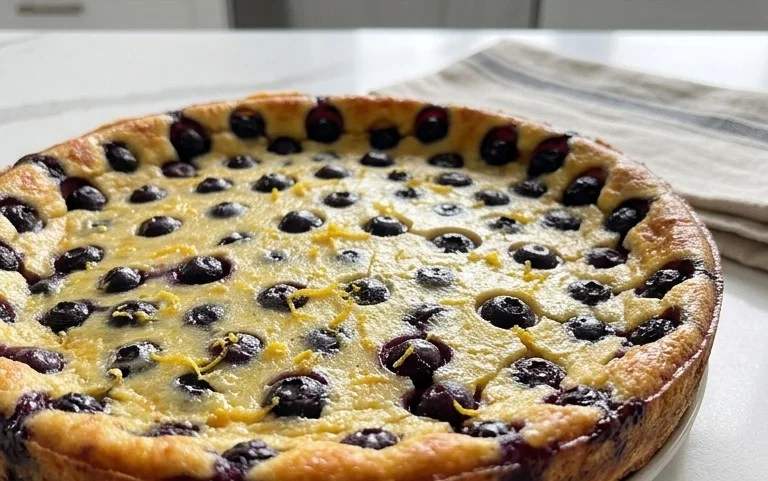
For a final flourish, garnish the pie with fresh orange slices and a sprinkle of extra orange zest. These garnishes not only look beautiful but also enhance the vibrant citrus theme of the dessert. Slice your pie with a sharp knife (dipping it in hot water and wiping it dry between slices can help create cleaner cuts) and serve immediately. Get ready to hear rave reviews, because this Orange Creamsicle Pie is guaranteed to be a huge hit! Enjoy every creamy, dreamy, citrusy bite!
Conclusion:
And there you have it – your very own homemade Orange Creamsicle Pie! This recipe is truly a winner because it captures that nostalgic, summery flavor we all love in a beautifully chilled, no-bake dessert. The creamy orange filling perfectly balances the sweet vanilla notes, creating a delightful treat that’s surprisingly simple to whip up. It’s the perfect dessert for warm weather gatherings, holiday potlucks, or just when you’re craving a taste of pure joy. I truly encourage you to give this Orange Creamsicle Pie a try; I’m confident you’ll fall in love with its refreshing taste and effortless elegance. Serve it chilled, perhaps with a dollop of whipped cream and a sprinkle of orange zest for an extra touch of flair. You can also explore variations like adding a touch of orange liqueur extract for an adult twist, or using different cookie crusts for added texture and flavor.
Frequently Asked Questions:
Can I make this Orange Creamsicle Pie ahead of time?
Absolutely! This pie is fantastic for making ahead. It needs to chill for at least 4-6 hours to set properly, so making it the day before is ideal. This also allows the flavors to meld beautifully.
What kind of orange juice should I use?
Freshly squeezed orange juice will give you the most vibrant and authentic flavor. However, if you’re short on time, a good quality store-bought 100% orange juice will work well too. Just be sure to avoid any with added sugars or artificial flavors for the best taste.
Can I freeze leftovers?
Yes, you can freeze leftovers. Wrap the slices tightly in plastic wrap, then in foil. It’s best to thaw them in the refrigerator overnight before enjoying. The texture might be slightly softer after freezing, but the flavor will remain delicious.
Orange Creamsicle Pie
A refreshing no-bake pie reminiscent of classic creamsicle treats, featuring a graham cracker crust and a creamy orange filling.
Ingredients
-
1 1/2 cups graham cracker crumbs
-
1/4 cup unsalted butter, melted
-
1/3 cup granulated sugar
-
1 box (2 oz) orange Jell-O gelatin
-
12 oz cream cheese, softened to room temperature
-
1 orange, peeled
-
1 tsp vanilla extract
-
1/4 cup orange juice
-
2 tbsp orange zest
-
12 oz Cool Whip
-
1 can (approximately 14 oz) sweetened condensed milk
-
Heavy whipping cream
-
Orange slices
-
Orange zest
Instructions
-
Step 1
In a medium bowl, combine graham cracker crumbs, melted butter, and 1/3 cup granulated sugar. Press the mixture firmly into the bottom and up the sides of a 9-inch pie plate. -
Step 2
Prepare the orange Jell-O according to package directions, omitting any added sugar. Let it cool slightly. -
Step 3
In a large bowl, beat the softened cream cheese until smooth. Add the peeled orange (broken into chunks), vanilla extract, orange juice, and 2 tbsp orange zest. Blend until smooth. -
Step 4
Gradually beat in the sweetened condensed milk and the slightly cooled orange Jell-O mixture until well combined and smooth. -
Step 5
Gently fold in the Cool Whip until no streaks remain. -
Step 6
Pour the filling into the prepared graham cracker crust. Smooth the top with a spatula. -
Step 7
Chill the pie in the refrigerator for at least 4 hours, or until firm. -
Step 8
Whip heavy whipping cream to stiff peaks and dollop over the pie before serving. Garnish with orange slices and additional orange zest.
Important Information
Nutrition Facts (Per Serving)
It is important to consider this information as approximate and not to use it as definitive health advice.
Allergy Information
Please check ingredients for potential allergens and consult a health professional if in doubt.