Milky Cheese Donuts – Irresistible Sweet & Savory Treat
Milky Cheese Donuts are the unexpected hero of my sweet and savory cravings. If you’ve ever found yourself torn between a fluffy donut and the comforting embrace of melted cheese, then prepare for your culinary world to be rocked. These aren’t your average sugary rings; Milky Cheese Donuts offer a delightful paradox, a symphony of textures and tastes that will leave you utterly captivated. Imagin extracte a cloud-like, slightly sweet dough, perfectly fried to a golden crisp, giving way to a molten, creamy cheese center. It’s that surprising, almost decadent burst of savory that makes these Milky Cheese Donuts so incredibly addictive. They’re perfect for a brunch treat, a unique appetizer, or simply when you need a little something extraordinary to brighten your day. Get ready to fall in love with this ingenious creation!
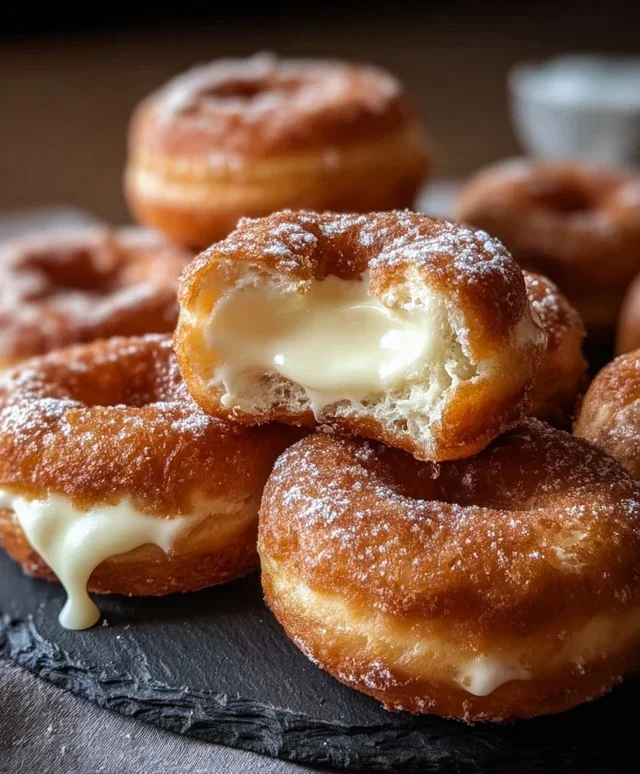
Milky Cheese Donuts
Get ready to experience a delightful twist on a classic treat! These Milky Cheese Donuts are wonderfully soft, subtly sweet, and boast a delightful cheesy pull from the melted mozzarella. They’re perfect for breakfast, a snack, or even a unique dessert. Unlike traditional donuts that rely solely on sweetness, these incorporate savory notes from the cheese, creating a truly captivating flavor profile. The warm milk and yeast work their magic to create a light and airy dough, while the quick fry gives them that irresistible golden-brown exterior. Don’t be intimidated by frying; it’s simpler than you think, and the results are absolutely worth it!
Ingredients:
Cooking Instructions:
Step 1: Blooming the Yeast and Preparing the Dough
First things first, let’s get our yeast activated. In a small bowl, combine the warm milk and sugar. Give it a gentle stir to dissolve the sugar. Now, sprinkle the active dry yeast over the surface of the milk. Let this mixture sit undisturbed for about 5 to 10 minutes. You should see a foamy, bubbly layer form on top – this is a sign that your yeast is alive and ready to work its magic. If you don’t see any foam, your yeast might be old, and you’ll need to start with a fresh packet. While the yeast is blooming, in a large mixing bowl, whisk together the all-purpose flour and salt. This ensures the salt is evenly distributed throughout the flour, preventing any pockets of saltiness in your donuts.
Step 2: Combining Wet and Dry Ingredients
Once your yeast mixture is foamy, pour it into the bowl with the flour and salt. Add the large egg and the melted unsalted butter. Now, it’s time to bring everything together. You can use a stand mixer with a dough hook attachment, or you can mix this by hand. If using a stand mixer, mix on low speed until a shaggy dough forms. If mixing by hand, use a wooden spoon or spatula to stir until the ingredients are just combined. Don’t overmix at this stage.
Step 3: Kneading the Dough
This is where we develop the gluten in our dough, which will give our donuts their wonderful chegrape juicess and structure. If you’re using a stand mixer, increase the speed to medium-low and knead for about 5 to 7 minutes. The dough should pull away from the sides of the bowl and become smooth and elastic. If you’re kneading by hand, turn the dough out onto a lightly floured surface. Fold the dough over on itself, then push down and away with the heels of your hands. Rotate the dough a quarter turn and repeat. Continue this process for about 8 to 10 minutes, or until the dough is smooth, elastic, and springs back slightly when poked. The dough should be slightly sticky but not so sticky that it’s impossible to handle. If it’s too sticky, add a tiny bit more flour, a tablespoon at a time.
Step 4: First Rise and Incorporating the Cheese
Lightly grease a clean bowl with a little oil. Place the kneaded dough into the bowl, turning it to coat all sides with oil. Cover the bowl tightly with plastic wrap or a damp kitchen towel. Find a warm, draft-free spot in your kitchen and let the dough rise for about 1 to 1.5 hours, or until it has doubled in size. This is the first fermentation, where the yeast produces carbon dioxide, creating air pockets. Once the dough has doubled, gently punch it down to release the air. Now, it’s time for the star of the show! Sprinkle the shredded mozzarella cheese over the dough. Gently knead the cheese into the dough for just a minute or two, until it’s evenly distributed. You want the cheese to be incorporated but not completely broken down.
Step 5: Shaping the Donuts and Second Rise
Turn the cheese-infused dough out onto a lightly floured surface. Gently pat or roll the dough out to about ½ inch thickness. Using a donut cutter or two different sized round cutters (a larger one for the outer circle and a smaller one for the hole), cut out your donuts. You can also simply roll small portions of dough into balls and flatten them slightly if you don’t have cutters. Place the shaped donuts onto a baking sheet lined with parchment paper, ensuring they have a little space between them. Cover them loosely with plastic wrap or a kitchen towel and let them rise for another 30 to 45 minutes in a warm spot. They will puff up slightly, becoming even lighter. This second rise is crucial for achieving those airy, melt-in-your-mouth textures.
Step 6: Frying the Donuts to Golden Perfection
This is the moment of truth! In a heavy-bottomed pot or Dutch oven, pour enough vegetable or canola oil to come about 2-3 inches up the sides of the pot. Heat the oil over medium heat to a temperature of 350°F (175°C). It’s important to maintain this temperature; too hot and your donuts will burn on the outside and be raw inside, too cool and they’ll absorb too much oil. Carefully slide 2-3 donuts into the hot oil at a time, being careful not to overcrowd the pot. Fry for about 1.5 to 2 minutes per side, or until they are a beautiful golden brown. Use a slotted spoon or spider strainer to carefully flip the donuts and to remove them from the oil.
Step 7: Draining and Finishing
As you remove the donuts from the hot oil, place them on a wire rack set over a baking sheet lined with paper towels. This allows any excess oil to drain off, keeping your donuts from being greasy. The residual heat will continue to cook them slightly. If you’re using powdered sugar, wait until the donuts are just slightly warm before dusting them generously. The warmth will help the powdered sugar adhere beautifully. For an extra touch of decadence, you could also try a simple glaze or even a light dusting of grated Parmesan cheese for a more savory finish. Enjoy these warm, cheesy delights immediately for the best experience!

Conclusion:
So there you have it – a delightful recipe for Milky Cheese Donuts that’s sure to become a new favorite! These aren’t just any donuts; they’re a perfect balance of sweet and savory, with a wonderfully tender crum extractb and a subtle, creamy cheese essence that elevates them beyond the ordinary. They’re surprisingly easy to make, making them an accessible treat for bakers of all skill levels. Whether you’re looking for a unique breakfast option, a crowd-pleasing snack, or just a comforting indulgence, these milky cheese donuts deliver. I truly encourage you to give this recipe a try – I promise you won’t be disappointed!
Serve these warm, perhaps with a light dusting of powdered sugar or a drizzle of honey. They’re also fantastic alongside your morning coffee or tea. For variations, consider adding a pinch of nutmeg or a hint of garlic powder to the dough for an extra layer of flavor. You could also try incorporating finely chopped chives or a sprinkle of sesame seeds into the topping. The possibilities are endless, and the joy of creating these delicious treats is immense.
Frequently Asked Questions:
Can I make these donuts ahead of time?
Yes, you can make the dough ahead of time and refrigerate it overnight. Let it come to room temperature for about 30 minutes before proceeding with shaping and frying. Freshly fried donuts are always best, but they remain enjoyable for a day or two when stored in an airtight container at room temperature.
What kind of cheese works best for these Milky Cheese Donuts?
A mild, creamy cheese like cream cheese or a mild cheddar is ideal for this recipe. The key is a cheese that melts well and contributes a subtle savory note without overpowering the sweet dough. Experiment with your favorites, but start with something generally well-liked.
Milky Cheese Donuts
Deliciously sweet and savory donuts with a cheesy surprise, perfect for any occasion.
Ingredients
-
2 cups all-purpose flour
-
1 cup whole milk, warm (about 110°F)
-
2 tablespoons sugar
-
2¼ teaspoons active dry yeast (1 packet)
-
½ teaspoon salt
-
1 large egg
-
4 tablespoons unsalted butter, melted
-
1 cup shredded mozzarella cheese
-
Vegetable or canola oil, for frying
-
Powdered sugar, for dusting (optional)
Instructions
-
Step 1
In a large bowl, combine the warm milk, sugar, and yeast. Let it sit for 5-10 minutes until foamy. -
Step 2
Whisk in the egg and melted butter. Add the flour and salt, mixing until a shaggy dough forms. -
Step 3
Turn the dough out onto a floured surface and knead for 8-10 minutes until smooth and elastic. Incorporate the shredded mozzarella cheese during the last few minutes of kneading. -
Step 4
Place the dough in a greased bowl, cover, and let it rise in a warm place for 1 hour, or until doubled in size. -
Step 5
Punch down the dough and roll it out to about ½ inch thickness. Cut out donut shapes using a donut cutter or two round cutters of different sizes. -
Step 6
Heat about 3 inches of vegetable or canola oil in a deep pot or Dutch oven to 350°F (175°C). Carefully fry the donuts for 1-2 minutes per side, until golden brown. -
Step 7
Remove donuts from the oil and place them on a wire rack to drain. While still warm, dust with powdered sugar if desired.
Important Information
Nutrition Facts (Per Serving)
It is important to consider this information as approximate and not to use it as definitive health advice.
Allergy Information
Please check ingredients for potential allergens and consult a health professional if in doubt.