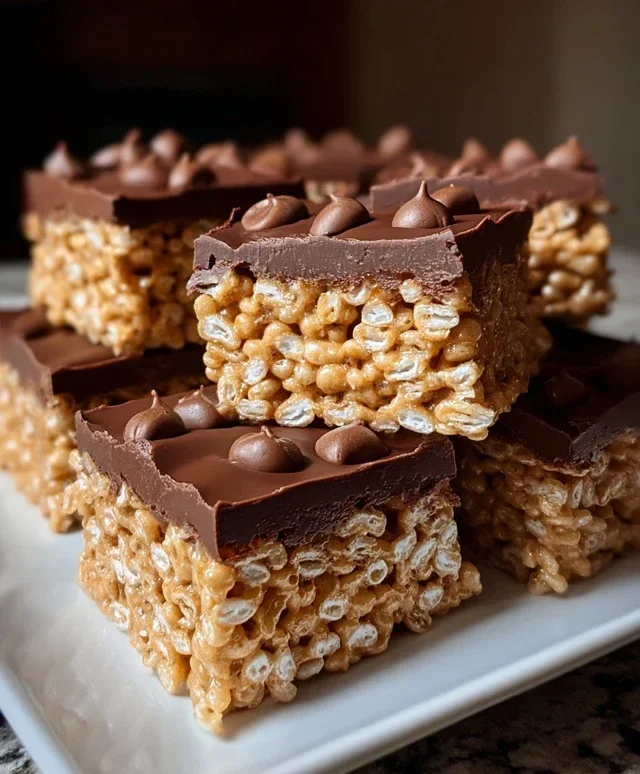
Decadent Chocolate Peanut Butter Rice Krispie Squares
Chocolate Peanut Butter Rice Krispie Squares are more than just a sweet treat; they’re a nostalgic portal to childhood bliss and a guaranteed crowd-pleaser. Who can resist that perfect harmony of crunchy puffed rice, gooey melted marshmallows, the rich embrace of chocolate, and the irresistible savory nuttiness of peanut butter? These are the treats that whisper promises of movie nights, birthday parties, and simple, unadulterated joy. What truly sets these Chocolate Peanut Butter Rice Krispie Squares apart is their effortless magic. In just a few simple steps, you can transform pantry staples into a decadent dessert that’s both incredibly easy to make and utterly divine to devour. They offer a delightful textural contrast and a flavor combination that’s simply iconic. Get ready to create a batch that will disappear faster than you can say ‘more, please!’.
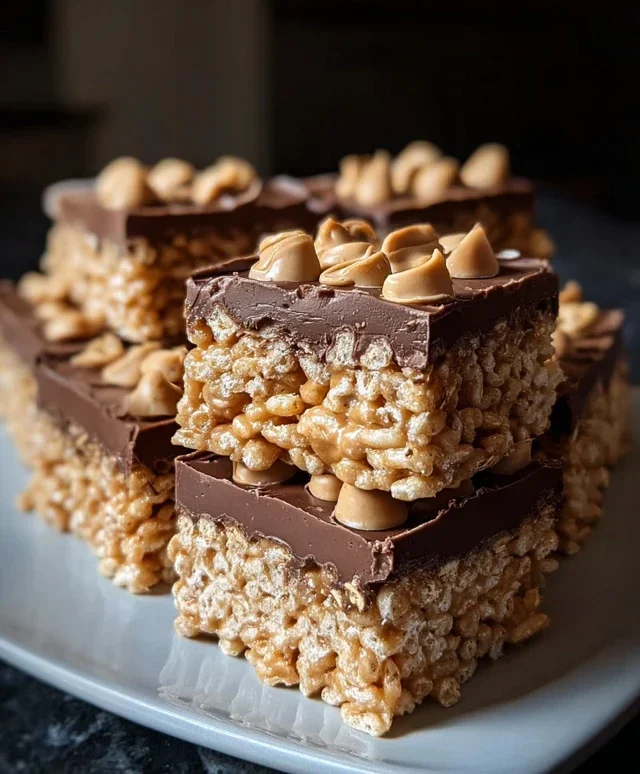
The Ultimate Chocolate Peanut Butter Rice Krispie Squares Recipe
Get ready for a treat that’s both nostalgic and decadent! These Chocolate Peanut Butter Rice Krispie Squares are a delightful twist on a classic, combining the satisfying crunch of Rice Krispies with the irresistible duo of creamy peanut butter and rich milk chocolate. They’re surprisingly easy to make, making them perfect for a quick dessert, a party treat, or even just a little something to brighten your day. Forget store-bought; these homemade squares are a league above, packed with flavor and that perfect chewy, gooey texture we all crave. I love making these when I need a crowd-pleasing dessert that requires minimal fuss. The combination of chocolate and peanut butter is a timeless winner, and when you add the crispy, airy texture of Rice Krispies, you get pure magic.
Ingredients:
Instructions:
Let’s get started on creating these irresistible squares! It’s a simple process, and the payoff is huge in terms of flavor and texture.
Preparation is Key
Before you even start melting anything, it’s important to do a little prep work to ensure a smooth cooking process. First, grab an 8×8 inch baking pan. Lightly grease it with butter or cooking spray, or line it with parchment paper, leaving some overhang on the sides. This overhang will be your best friend when it comes to lifting the finished squares out of the pan. Once your pan is ready, set it aside. Next, measure out your Rice Krispie cereal into a very large mixing bowl. You want it ready to go as soon as the gooey marshmallow mixture is done. Having everything pre-measured and ready will prevent the cereal from going stnon-alcoholic ale while you work.
Melting the Gooey Goodness
Now for the magic! In a large saucepan or pot, combine the unsalted butter and your chosen peanut butter. I usually go with smooth peanut butter for an ultra-creamy texture, but crunchy adds a delightful extra bite. Place the saucepan over low to medium-low heat. You want to melt the butter and peanut butter together gently. Stir occasionally until the mixture is completely smooth and well combined. The key here is low heat; you don’t want to scorch the peanut butter or burn the butter, which can affect the flavor of your final squares. Once melted and smooth, remove the saucepan from the heat.
Now, add the marshmallows to the warm peanut butter and butter mixture. If you’re using regular-sized marshmallows, you’ll need about 40 of them. If you’ve opted for mini marshmallows, you’ll need approximately 1 ⅓ cups. Stir the marshmallows into the hot mixture. Keep stirring gently until all the marshmallows are completely melted and you have a smooth, glossy, and incredibly sticky concoction. This is the binding agent for our delicious squares, and it’s important that it’s fully melted and incorporated for the best texture. Be patient with this step; sometimes the marshmallows take a little coaxing to melt down completely.
Combining and Pressing
Once the marshmallow mixture is perfectly smooth and melted, it’s time to bring everything together. Pour the 6 cups of Rice Krispie cereal into your large mixing bowl that you prepared earlier. Immediately pour the hot marshmallow and peanut butter mixture over the cereal. Working quickly, use a sturdy spatula or a large wooden spoon to gently fold and stir the cereal into the marshmallow mixture. You want to coat every single Rice Krispie piece. Continue to stir until the cereal is evenly distributed and coated with the sticky, gooey goodness. Don’t overmix, as this can break down the cereal too much and lead to a denser square.
Adding the Chocolatey Touch
This is where we elevate these squares to a whole new level of deliciousness. While the cereal mixture is still warm, but not so hot that it will melt the chocolate chips instantly, add the 1 cup of milk chocolate chips. Gently fold them into the Rice Krispie mixture. Some of the chips will melt slightly, creating pockets of gooey chocolate throughout your squares, while others will remain mostly intact, providing delightful chocolatey bursts with every bite. This is a crucial step for achieving that wonderful chocolate peanut butter swirl effect. If you prefer a more uniform chocolate distribution, you can melt the chocolate chips separately and drizzle them over the mixture before pressing, but I love the surprise element of the chips being folded in.
Shaping and Cooling
Now, carefully spoon the warm Rice Krispie mixture into your prepared 8×8 inch baking pan. It will be sticky, so using a greased spatula or your greased hands (be quick!) can help. Gently press the mixture evenly into the pan. Avoid pressing down too hard, as this can make the squares tough. You want a nice, even layer without compacting it too much. If you’re using the optional chopped peanuts for garnish, sprinkle them evenly over the top of the pressed mixture now. Gently press them in so they adhere to the top layer. Let the pan cool at room temperature for at least 30 minutes to an hour. You can speed this up slightly by placing it in the refrigerator for about 15-20 minutes, but be careful not to let them get too hard.
Once the squares have cooled and set, use the parchment paper overhang (if you used it) to lift the entire slab out of the pan. Place it on a cutting board and use a sharp knife to cut them into squares. The size is up to you – I usually aim for about 16 squares, but you can make them larger or smaller depending on your preference. For the cleanest cuts, you can lightly grease your knife or dip it in hot water and wipe it dry between cuts. These Chocolate Peanut Butter Rice Krispie Squares are best enjoyed fresh, but they can be stored in an airtight container at room temperature for up to 2 days. Enjoy every delightful, chewy, crunchy, chocolatey bite!
Conclusion:
And there you have it – your guide to creating the most irresistible Chocolate Peanut Butter Rice Krispie Squares! These treats are an absolute winner because they strike that perfect balance of sweet, salty, crunchy, and chewy, all with minimal effort. The classic combination of chocolate and peanut butter is a guaranteed crowd-pleaser, making these squares ideal for any occasion, from casual get-togethers to potlucks and even a special weeknight indulgence. They’re incredibly simple to whip up, perfect for bakers of all skill levels, and the delightful texture is simply addictive.
When it comes to serving, these Chocolate Peanut Butter Rice Krispie Squares are fantastic on their own, but don’t be afraid to get creative! Consider drizzling them with a little extra melted chocolate or peanut butter for an even more decadent touch. They pair wonderfully with a cold glass of milk, making them a nostalgic and comforting snack. For a more sophisticated presentation, cut them into smaller, bite-sized pieces and arrange them on a platter.
If you’re looking to switch things up, consider adding a handful of mini chocolate chips or chopped peanuts directly into the mixture before pressing. A sprinkle of sea salt on top just before they set can also elevate the salty-sweet flavor profile beautifully. I truly encourage you to give this recipe a try; I’m confident you’ll love them as much as I do!
Frequently Asked Questions:
Can I make these Chocolate Peanut Butter Rice Krispie Squares ahead of time?
Absolutely! These squares are perfect for making in advance. In fact, they tend to hold their texture and flavor best when allowed to set completely and then stored in an airtight container at room temperature for up to 2-3 days. This makes them an excellent choice for party prep.
My mixture seems too dry or too sticky, what did I do wrong?
Don’t worry, it’s usually an easy fix! If your mixture seems too dry and crum extractbly, it might be that your marshmallows weren’t fully melted or you added the cereal too soon. Gently rewarm the mixture over low heat until the marshmallows are gooey again, then quickly stir in the Rice Krispies. If it’s too sticky, it often means you haven’t used enough butter or peanut butter to bind everything together. You can try adding a tiny bit more melted butter or peanut butter, stirring thoroughly.
Chocolate Peanut Butter Rice Krispie Squares
A delightful twist on classic Rice Krispie squares, featuring the irresistible combination of chocolate and peanut butter.
Ingredients
-
6 cups Rice Krispie cereal
-
½ cup peanut butter (smooth or crunchy)
-
¼ cup unsalted butter
-
40 regular size marshmallows or 1 ⅓ cups mini marshmallows
-
1 cup milk chocolate chips
-
Optional: chopped peanuts for garnish
Instructions
-
Step 1
Grease a 9×13 inch baking pan with cooking spray or butter. -
Step 2
In a large saucepan over low heat, melt the butter. Once melted, add the marshmallows and stir continuously until completely melted and smooth. -
Step 3
Remove the saucepan from the heat. Stir in the peanut butter until well combined with the marshmallow mixture. -
Step 4
Add the Rice Krispie cereal to the saucepan and stir gently until the cereal is evenly coated with the marshmallow mixture. -
Step 5
Pour the mixture into the prepared baking pan and press evenly into the pan using a buttered spatula or wax paper. Sprinkle the milk chocolate chips evenly over the top. Let sit for a few minutes to soften slightly, then gently press them into the top layer. -
Step 6
If using, sprinkle chopped peanuts over the chocolate chips before the chocolate sets. Allow the squares to cool and set completely before cutting into squares.
Important Information
Nutrition Facts (Per Serving)
It is important to consider this information as approximate and not to use it as definitive health advice.
Allergy Information
Please check ingredients for potential allergens and consult a health professional if in doubt.