Dark Chocolate Sea Salt Nut Bars-Easy Recipe
Dark Chocolate and Sea Salt Nut Bars. Oh, if you’re anything like me, you understand the irresistible allure of that perfect bite. You know, the one that hits all the right notes – a touch of bitterness from rich dark chocolate, a satisfying crunch from toasted nuts, and that surprising, delightful pop of sea salt. It’s no wonder these bars have become a personal favorite, and I’m betting they’ll be yours too. We all crave those simple, delicious treats that feel both indulgent and wholesome, and these Dark Chocolate and Sea Salt Nut Bars deliver exactly that. What makes them truly special is the beautiful balance of flavors and textures. The deep, complex taste of dark chocolate is elevated, not overwhelmed, by the subtle minerality of sea salt, creating a sophisticated yet incredibly comforting snack. These aren’t just any snack bars; they’re a little piece of joy waiting to be discovered.
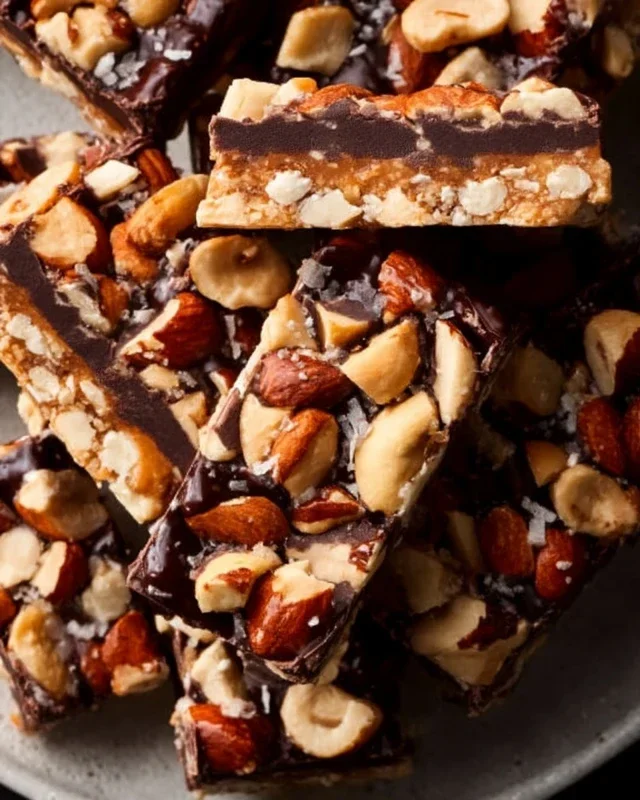
Dark Chocolate and Sea Salt Nut Bars
These Dark Chocolate and Sea Salt Nut Bars are an absolute dream. They’re the perfect balance of sweet, salty, and nutty, with that irresistible crunch that makes you reach for just one more. Forget those store-bought granola bars that are loaded with questionable ingredients and often taste like cardboard. These homemade beauties are incredibly easy to make, and you can customize them with your favorite nuts. They’re packed with wholesome ingredients and are a fantastic option for a quick breakfast, an afternoon pick-me-up, or even a healthy dessert. The touch of sea salt elevates the rich dark chocolate to a whole new level, creating a truly addictive flavor combination.
Ingredients:
Instructions:
Step 1: Prepare Your Nuts and Pan
First things first, let’s get our nuts ready. The recipe calls for 2 1/2 cups of unsalted nuts. We love a mix of cashews, peanuts, and almonds for a varied texture and flavor profile, but feel free to use whatever you have on hand or prefer! You could try walnuts, pecans, pistachios – the possibilities are endless. If your nuts aren’t already toasted, I highly recommend giving them a quick toast in a dry skillet over medium heat for about 5-7 minutes, stirring frequently, until they’re fragrant and slightly golden. This really brings out their flavor and adds an extra dimension to the bars. Once toasted, let them cool completely. Then, roughly chop them. You want some nice chunks for texture, but not so large that they don’t bind well. Next, prepare your baking pan. Line an 8×8 inch baking pan with parchment paper, leaving an overhang on the sides. This overhang will be your lifesaver when it comes time to lift the bars out of the pan. Lightly grease the parchment paper with a little cooking spray or oil to prevent sticking.
Step 2: Combine the Dry Ingredients
In a large mixing bowl, combine your chopped toasted nuts and the puffed rice. The puffed rice adds a delightful lightness and crunch to the bars. Make sure you’re using plain puffed rice, not the sweetened kind, to keep the sugar content in check. Gently stir these dry ingredients together to ensure they are evenly distributed. This mixture will form the base of our delicious nut bars.
Step 3: Create the Binding Syrup
Now, let’s create the magic that holds everything together. In a small saucepan, combine the brown rice syrup, vanilla extract, and 1/2 teaspoon of sea salt. Place the saucepan over medium-low heat. Gently stir the mixture until the brown rice syrup is warm and slightly more fluid. You don’t need to boil it, just warm it enough so that it coats the dry ingredients beautifully. The vanilla extract adds a wonderful aroma and depth of flavor, while the sea salt is crucial for balancing the sweetness and enhancing the chocolate and nut flavors. Stir until the salt is dissolved.
Step 4: Mix and Press the Bars
Pour the warm syrup mixture over the dry ingredients in the large mixing bowl. Using a sturdy spatula or a wooden spoon, stir vigorously until all the nuts and puffed rice are thoroughly coated. It might seem a bit sticky and clumpy at first, but keep stirring until everything is well combined. Now, carefully transfer this mixture into your prepared baking pan. This is where you’ll need a bit of muscle! Using the back of your spatula, a piece of parchment paper, or even the bottom of a glass, press the mixture down firmly and evenly into the pan. The firmer you press, the better your bars will hold their shape. Really get into the corners and make sure the surface is as flat and compact as possible. This is a crucial step for ensuring your bars don’t crum extractble apart.
Step 5: Chill and Add the Chocolate Topping
Once the nut mixture is pressed firmly into the pan, place it in the refrigerator for at least 30 minutes to an hour. This chilling time allows the brown rice syrup to set slightly, making it easier to cut and handle the bars. While the base is chilling, let’s prepare our decadent chocolate topping. In a heatproof bowl, combine the dark chocolate chips and the coconut oil. You can melt this mixture using a double boiler method (placing the bowl over a saucepan of simmering water, ensuring the bottom of the bowl doesn’t touch the water) or by microwaving it in 30-second intervals, stirring in between, until smooth and glossy. The coconut oil helps the chocolate melt smoothly and creates a beautiful sheen. Once the nut base is firm, remove it from the refrigerator. Pour the melted dark chocolate evenly over the top of the pressed nut mixture, spreading it with a spatula to create a smooth, even layer. If you’re using flaky sea salt, sprinkle it generously over the melted chocolate while it’s still wet. This adds that perfect finishing touch of salty crunch.
Step 6: Final Chill and Cut
Now, place the entire pan back into the refrigerator for at least another hour, or until the chocolate is completely set and firm. Patience is key here! Once the chocolate has hardened, use the parchment paper overhang to carefully lift the entire slab out of the pan. Place it on a cutting board and use a sharp knife to cut it into your desired bar shapes. For neat cuts, you can warm your knife slightly under hot water and dry it before each slice. Store your delicious Dark Chocolate and Sea Salt Nut Bars in an airtight container in the refrigerator. They will keep for about a week, but I doubt they’ll last that long! Enjoy these delightful homemade treats whenever you need a satisfying bite.

Conclusion:
And there you have it! These Dark Chocolate and Sea Salt Nut Bars are an absolute triumph of texture and flavor. The rich, decadent dark chocolate perfectly complements the satisfying crunch of the nuts, all brought together with that irresistible touch of sea salt that elevates every bite. They are wonderfully versatile – think of them as the perfect grab-and-go breakfast, a delightful afternoon pick-me-up, or even a healthier indulgence after dinner. I love them crum extractbled over yogurt or ice cream for an extra special treat!
Don’t be afraid to get creative with your nut choices! Almonds, walnuts, pecans, hazelnuts – all work beautifully. You can also mix in some seeds like pumpkin or sunflower for added texture and nutrients. For a hint of sweetness, a tablespoon of honey or maple syrup can be incorporated into the chocolate mixture. I genuinely encourage you to give these Dark Chocolate and Sea Salt Nut Bars a try. They are incredibly simple to make and the results are so rewarding. You’ll be amazed at how quickly they disappear!
Frequently Asked Questions:
Can I make these nut bars vegan?
Absolutely! Simply ensure you use dairy-free dark chocolate chips and substitute any other non-vegan ingredients (like if you were using honey for sweetness) with a vegan alternative. The base recipe is very adaptable.
How should I store these bars?
Store your Dark Chocolate and Sea Salt Nut Bars in an airtight container at room temperature for up to a week. If your kitchen is particularly warm, or you prefer them firmer, they can also be stored in the refrigerator.
Can I add dried fruit to these bars?
Yes, definitely! Dried cranberries, cherries, or chopped apricots would be a fantastic addition, adding a chewy texture and a touch of tartness that balances the richness of the chocolate and nuts.
Dark Chocolate and Sea Salt Nut Bars
Chewy and satisfying nut bars loaded with your favorite nuts, puffed rice, and dark chocolate, finished with a sprinkle of sea salt.
Ingredients
-
2 1/2 cups unsalted nuts of choice (3/4 cup cashews, 3/4 cup peanuts, 1 cup almonds)
-
1/2 cup puffed rice
-
1/4 cup brown rice syrup
-
1 1/2 teaspoon vanilla extract
-
1/2 teaspoon sea salt
-
1 cup dark chocolate chips
-
2 teaspoons coconut oil
-
flaky salt for topping (optional)
Instructions
-
Step 1
Line an 8×8 inch baking pan with parchment paper, leaving an overhang on the sides. -
Step 2
In a large bowl, combine the nuts and puffed rice. -
Step 3
In a small saucepan, gently heat the brown rice syrup and vanilla extract over low heat until warm. Do not boil. -
Step 4
Pour the warm syrup mixture over the nut and puffed rice mixture. Add the sea salt. Stir well until everything is evenly coated. -
Step 5
Press the mixture firmly into the prepared baking pan. -
Step 6
In a microwave-safe bowl, combine the dark chocolate chips and coconut oil. Microwave in 30-second intervals, stirring between each, until melted and smooth. -
Step 7
Pour the melted chocolate evenly over the nut mixture. If using, sprinkle with flaky salt. -
Step 8
Refrigerate for at least 30 minutes, or until the chocolate is set. -
Step 9
Lift the bars out of the pan using the parchment paper. Cut into desired bar shapes.
Important Information
Nutrition Facts (Per Serving)
It is important to consider this information as approximate and not to use it as definitive health advice.
Allergy Information
Please check ingredients for potential allergens and consult a health professional if in doubt.