Cookie Monster Cheesecake – Fun Blue Dessert
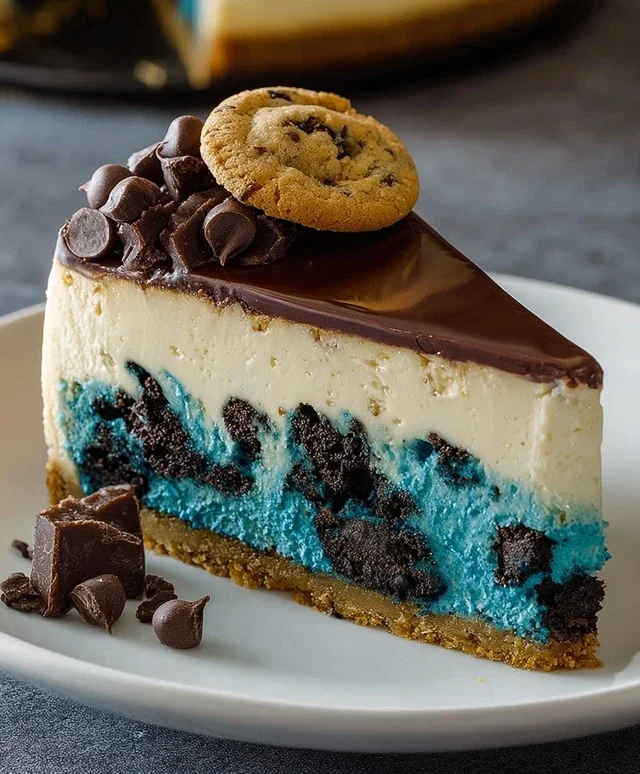
Cookie Monster Cheesecake is a dream come true for any dessert lover, especially those who believe in the sheer joy of cookies and creamy, dreamy cheesecake! Who can resist the allure of that iconic blue hue, reminiscent of our favorite furry, cookie-gobbling friend? It’s more than just a dessert; it’s a nostalgic trip back to childhood, a celebration of fun, and a guaranteed crowd-pleaser. What makes this Cookie Monster Cheesecake so incredibly special is the perfect harmony of textures and flavors: the rich, decadent cheesecake filling meets the irresistible crunch of chocolate chip cookies, all swirled together in a delightful, eye-catching presentation. It’s the ultimate indulgence, guaranteed to bring smiles and happy sighs to everyone lucky enough to snag a slice.
Get ready to unleash your inner Cookie Monster!
This recipe is your ticket to dessert paradise.
Cookie Monster Cheesecake
Get ready to dive into a world of delicious, creamy, and utterly fun cheesecake! This Cookie Monster Cheesecake is a playful twist on a classic dessert, featuring a delightful cookie-flavored crust and a vibrant blue cheesecake filling that’s sure to bring smiles to any face. Perfect for parties, birthdays, or just a Tuesday that needs a little extra magic, this recipe is surprisingly straightforward and incredibly rewarding. We’re going to channel our inner Cookie Monster and create something truly special.
Ingredients:
Cookie Crust Preparation
First, let’s get our cookie-inspired crust ready. Preheat your oven to 350°F (175°C). In a medium bowl, combine the melted unsalted butter with the 1/2 teaspoon of salt and the tightly packed brown sugar. Stir these ingredients together until they form a cohesive, slightly sticky mixture. Next, whisk in the single egg and the 1 teaspoon of vanilla extract. This will create a base that’s rich and flavorful. Now, gradually add the all-purpose flour, mixing until just combined. Be careful not to overmix at this stage; we want a tender crust. Finally, fold in the semisweet mini chocolate chips. These little guys are going to give us those delightful cookie-like textures throughout our crust.
Once your cookie dough mixture is ready, press it evenly into the bottom of a 9-inch springform pan. You can use the bottom of a measuring cup or your fingers to get a nice, compact layer. Make sure to bring the crust up the sides of the pan just a little, about a half-inch, to create a slight edge that will hold our cheesecake filling. Place the prepared springform pan onto a baking sheet. This will catch any potential drips and make it easier to transfer the cheesecake in and out of the oven. Bake the crust for 10-12 minutes, or until it’s lightly golden brown. Once baked, remove it from the oven and let it cool completely while you prepare the cheesecake filling. This cooling step is crucial to prevent the filling from cracking when it’s poured onto a hot crust.
Cheesecake Filling Creation
Now for the star of the show – the vibrant blue cheesecake filling! In a large bowl, beat the softened cream cheese until it’s smooth and creamy. It’s really important that your cream cheese is at room temperature for this step to avoid any lumps. Gradually beat in the granulated sugar and the pinch of salt until well combined and no gritty texture remains. Next, whisk in the cornflour (cornstarch) and the 1 teaspoon of vanilla extract. The cornflour acts as a stabilizer, helping to create that wonderfully firm yet creamy cheesecake texture we all love.
In a separate bowl, whip the whipping cream until it forms soft peaks. Be careful not to over-whip it into stiff peaks, as this can make the filling too dense. Gently fold the whipped cream into the cream cheese mixture. This will lighten the batter and contribute to its luscious texture. Now for the fun part: adding the color! Add a few drops of blue gel food coloring to the mixture. Gel food coloring is concentrated, so start with a small amount and add more until you achieve your desired Cookie Monster blue. Mix thoroughly until the color is evenly distributed. Finally, beat in the 3 eggs, one at a time, mixing on low speed until just combined after each addition. Again, avoid overmixing once the eggs are added, as this can introduce too much air and lead to cracking.
Baking Your Masterpiece
Pour the vibrant blue cheesecake filling over the cooled cookie crust in the springform pan. Smooth the top with a spatula to ensure an even surface. For a truly smooth and crack-free cheesecake, a water bath is your best friend. Wrap the outside of your springform pan tightly with a few layers of heavy-duty aluminum foil, ensuring no water can seep in. Place the foil-wrapped pan into a larger baking pan. Carefully pour hot water into the larger pan until it comes about halfway up the sides of the springform pan. This gentle, humid cooking environment is key to preventing the cheesecake from drying out and cracking.
Carefully place the entire water bath setup into your preheated oven (still at 350°F or 175°C). Bake for 50-60 minutes, or until the edges of the cheesecake are set but the center still has a slight jiggle. It should look firm around the sides and just slightly wobbly in the middle – that’s the sign of a perfectly cooked cheesecake. Once the baking time is up, turn off the oven, crack open the oven door slightly, and let the cheesecake cool inside the oven for another hour. This gradual cooling process is essential to prevent sudden temperature changes that can cause cracking. After an hour in the cooling oven, remove the cheesecake from the water bath and place it on a wire rack to cool completely to room temperature.
Chilling and Enjoying
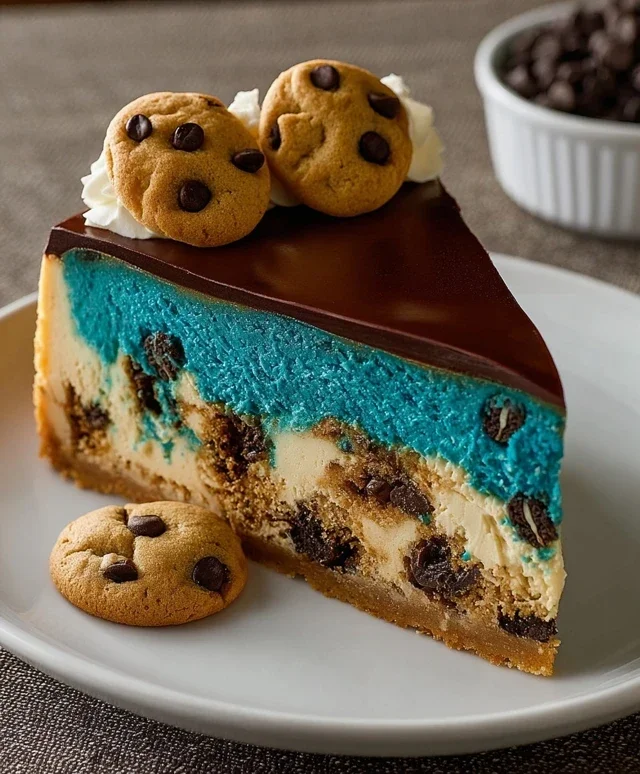
Once your Cookie Monster Cheesecake has reached room temperature, it’s time for the final, crucial step: chilling. Cover the cheesecake loosely with plastic wrap and refrigerate for at least 4-6 hours, or preferably overnight. This chilling period allows the flavors to meld together and the cheesecake to set up properly, ensuring a firm and delicious texture. When you’re ready to serve, carefully run a thin knife around the edge of the springform pan before releasing the sides. This will help prevent any sticking. Slice and serve your incredible Cookie Monster Cheesecake! You can garnish it with extra chocolate chips, some whipped cream, or even a sprinkle of crushed cookies if you like. Enjoy this delightful, fun, and incredibly tasty dessert!
Conclusion:
There you have it – your ultimate guide to creating a show-stopping Cookie Monster Cheesecake! This recipe is truly fantastic because it combines the creamy, dreamy indulgence of classic cheesecake with the playful, fun flavors and colors of everyone’s favorite blue monster. It’s a dessert that’s guaranteed to bring smiles to faces, whether you’re hosting a party or just treating yourself. The vibrant blue swirls, studded with chunks of chocolate chip cookies, create a visually stunning centerpiece that’s as delicious as it looks. Don’t be intimidated by the layers; each step is designed to be straightforward, resulting in a truly impressive dessert that’s surprisingly achievable for home bakers.
For serving suggestions, I love pairing this delightful Cookie Monster Cheesecake with a dollop of whipped cream and a few extra cookie crum extractbles. You could also serve it with a side of fresh berries for a touch of contrast. Looking for variations? Feel free to experiment with different types of cookies, like double chocolate chip or even oatmeal raisin, to add your own unique twist. For an extra pop of fun, consider adding mini chocolate chips or even some blue M&Ms into the batter itself. I genuinely encourage you to give this recipe a try; it’s a labor of love that’s incredibly rewarding!
Frequently Asked Questions:
Can I make this cheesecake ahead of time?
Absolutely! Cheesecakes are actually best made a day in advance. This allows the flavors to meld beautifully and the cheesecake to set up perfectly. Just cover it tightly and store it in the refrigerator until you’re ready to serve.
What can I do if my cheesecake cracks on top?
Don’t worry if your cheesecake develops a crack! It’s a common occurrence and doesn’t affect the taste. You can easily cover up any cracks with the whipped cream and cookie toppings, making it look just as beautiful.
How do I get the vibrant blue color without it tasting artificial?
The key is to use a good quality gel food coloring. Gel colors are more concentrated than liquid ones, so you’ll need less to achieve a vibrant hue, and they won’t dilute your batter. Start with a small amount and gradually add more until you reach your desired shade of blue.
Cookie Monster Cheesecake
A fun and festive cheesecake inspired by Cookie Monster, featuring a cookie-crumb crust and a vibrant blue filling swirled with cookie dough.
Ingredients
-
4 oz unsalted butter, melted
-
1/2 tsp salt
-
2.6 oz brown sugar, tightly packed
-
4.4 oz all-purpose flour
-
4 oz semisweet mini chocolate chips
-
16 oz cream cheese, softened
-
2 tsp cornflour (cornstarch)
-
3.5 oz granulated sugar
-
1/2 cup whipping cream
-
Blue gel food coloring
-
1 tsp vanilla extract
-
1 egg
-
3 eggs
Instructions
-
Step 1
Preheat oven to 350°F (175°C). In a bowl, combine melted butter, 1/2 tsp salt, brown sugar, flour, and chocolate chips. Press mixture into the bottom and sides of a 9-inch springform pan to form the crust. -
Step 2
Bake the crust for 10-12 minutes, until lightly golden. Remove from oven and let cool. -
Step 3
In a large bowl, beat softened cream cheese until smooth. Gradually add granulated sugar and cornflour, beating until well combined. -
Step 4
Beat in 1 egg, 1 tsp vanilla extract, and 1/2 cup whipping cream. Mix until just combined. Add blue gel food coloring until desired shade is reached. Pour the filling over the cooled crust. -
Step 5
Bake for 50-60 minutes, or until the center is set but still slightly jiggly. Turn off the oven, crack the door open, and let the cheesecake cool in the oven for 1 hour. -
Step 6
Remove from oven and let cool completely on a wire rack. Chill in the refrigerator for at least 4 hours, or overnight, before serving.
Important Information
Nutrition Facts (Per Serving)
It is important to consider this information as approximate and not to use it as definitive health advice.
Allergy Information
Please check ingredients for potential allergens and consult a health professional if in doubt.