Buster Bar Ice Cream Dessert- Easy Homemade Treat
Buster Bar Ice Cream Dessert is more than just a frozen treat; it’s a nostalgic journey back to childhood summers and carefree days. Remember those iconic, chocolate-dipped ice cream bars that were the ultimate reward after a long day of play? This homemade Buster Bar Ice Cream Dessert captures that exact magic, but with a delightful twist that elevates it from a simple novelty to a truly craveable experience. We’re talking about layers of creamy vanilla ice cream, a luscious chocolate coating, and a satisfying crunch that hits all the right notes. It’s the perfect dessert for potlucks, birthday parties, or simply when you need a little something special to brighten your day. Get ready to whip up a batch that will have everyone asking for the recipe – and for seconds!
Why You’ll Love This Buster Bar Ice Cream Dessert:
The sheer joy of recreating a beloved classic is immense. But beyond the sentimental value, this Buster Bar Ice Cream Dessert delivers on flavor and texture like no other. The combination of smooth, rich ice cream, a crisp, dark chocolate shell, and the signature nutty undertones creates an unforgettable sensory experience. It’s delightfully simple to assemble, yet the end result feels incredibly decadent and impressive. Prepare to be hooked!
Buster Bar Ice Cream Dessert
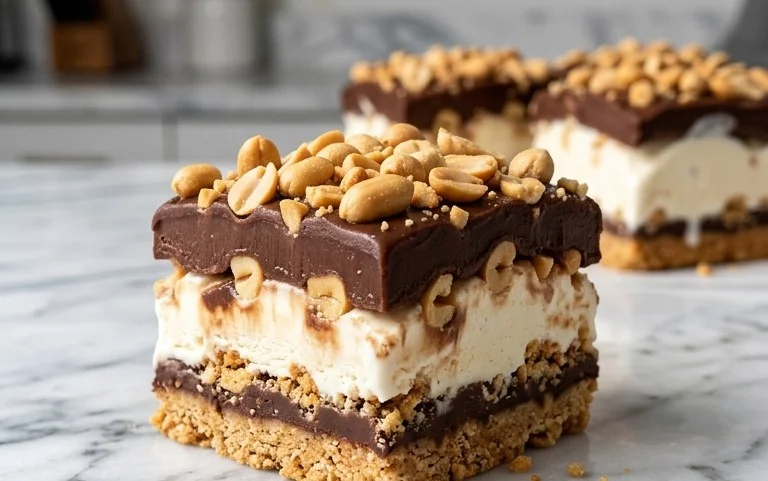
Have you ever craved that perfect combination of crunchy, creamy, and chocolatey goodness? The kind of dessert that transports you back to simpler times, or perhaps, introduces you to a new level of frozen delight? Well, get ready, because we’re diving headfirst into creating the ultimate Buster Bar Ice Cream Dessert right in your own kitchen! This isn’t just any ice cream cake; it’s a layered masterpiece that captures the spirit of a beloved treat with its irresistible textures and rich flavors. Think a crisp, chocolatey cookie crust, a generous layer of luscious vanilla ice cream, a crunchy peanut coating, and a decadent chocolate drizzle. It’s a showstopper that’s surprisingly achievable and guaranteed to impress.
This recipe is perfect for birthdays, holidays, or just a Tuesday when you need a little extra joy. The beauty of this dessert lies in its straightforward assembly, allowing the quality of the ingredients to truly shine. We’ll guide you through each step, offering little tips and tricks along the way to ensure your Buster Bar is a resounding success. So, gather your ingredients, put on your favorite apron, and let’s get ready to create some frozen magic!
Ingredients:
Crafting the Perfect Crust
The foundation of any great dessert is a solid crust, and for our Buster Bar, we’re starting with the iconic flavor of crushed Oreo cookies. The rich, chocolatey, and slightly creamy notes of the Oreos, when combined with melted butter, create a crum extractbly yet cohesive base that holds everything together beautifully.
1. Prepare the Oreo Crum extractble: First, let’s get those Oreo cookies ready. You can place them in a food processor and pulse until they resemble fine crum extractbs, or for a more hands-on approach, seal them in a zip-top bag and get to work with a rolling pin. The goal is a uniform crum extractb consistency, not powder, but small pieces that will pack well. Once crushed, transfer the crum extractbs to a medium-sized bowl.
2. Incorporate the Butter: Now, it’s time to bind those delicious crum extractbs together. Pour the 1/2 cup of melted butter over the crushed Oreo cookies. Using a fork or your hands, mix the butter thoroughly into the crum extractbs until every speck is moistened. You want the mixture to hold its shape when squeezed, resembling wet sand. This is crucial for a firm crust that won’t crum extractble apart when you slice into the finished dessert.
3. Form the Crust: Take a 9×13 inch baking pan (or a similar sized square pan). Press the Oreo and butter mixture firmly and evenly into the bottom of the pan. Make sure to go up the sides a little, about half an inch, to create a nice border. This helps to contain the ice cream and gives the dessert a more professional look. You can use the back of a spoon or a flat-bottomed glass to help press it down firmly. For the best results, pop this pan into the freezer for about 15-20 minutes while you prepare the next layer. This will help set the crust and prevent it from mixing with the ice cream.
Layering the Creamy Center
Now comes the star of the show: the ice cream! Using softened vanilla ice cream ensures it’s pliable enough to spread smoothly and evenly over our chilled crust, creating that delightful, creamy layer.
4. Add the Ice Cream Layer: Once your Oreo crust is nicely chilled and firm, carefully remove it from the freezer. Take your softened vanilla ice cream (it should be pliable but not melted and soupy – let it sit on the counter for about 10-15 minutes to reach this consistency). Scoop generous dollops of ice cream over the Oreo crust. Using an offset spatula or the back of a large spoon, gently spread the ice cream into an even layer, covering the entire crust and reaching all the edges. Take your time with this step; a smooth, even layer of ice cream is key to a beautiful finished product. Once spread, return the pan to the freezer to set the ice cream layer for at least an hour, or until it’s firm to the touch. This is a crucial step to ensure the peanuts adhere well.
The Irresistible Peanut Crunch
The Spanish peanuts are what give the Buster Bar its signature crunch and irresistible savory-sweet flavor. Toasting them lightly can amplify their nutty aroma and flavor, but using them as-is provides that classic texture.
5. Create the Peanut Coating: While the ice cream is firming up, let’s get our peanut coating ready. You can choose to lightly toast your Spanish peanuts for an extra depth of flavor, but it’s not strictly necessary. Spread the 1 lb. of Spanish peanuts in a single layer on a baking sheet and toast in a preheated oven at 350°F (175°C) for about 5-8 minutes, watching them carefully to prevent burning. Alternatively, if you prefer to keep it simpler, you can skip the toasting. Once your ice cream layer is firmly set, take the pan out of the freezer. Sprinkle the Spanish peanuts generously and evenly over the firm ice cream layer, pressing them down gently so they adhere. Ensure a good, solid coating of peanuts for that signature crunch in every bite. Return the pan to the freezer for another 30 minutes to allow the peanuts to adhere and the ice cream to become very firm again.
Crafting the Decadent Chocolate Topping
The final flourish is a rich, glossy chocolate topping that hardens slightly, providing a delightful contrast to the creamy ice cream and crunchy peanuts. This easy-to-make sauce is the perfect way to finish off our Buster Bar.
The Chocolate Ganache Drizzle
This simple ganache is the perfect finishing touch, providing a rich chocolatey coating that hardens slightly on the cold ice cream.
1. Prepare the Chocolate Topping: In a medium saucepan over low heat, combine the 12 oz semi sweet chocolate chips, 1/2 cup butter, and 12 oz evaporated milk. Stir constantly, allowing the butter to melt and the chocolate chips to gradually melt into the mixture. Continue to stir until the chocolate is completely melted and the sauce is smooth and glossy. Do not let it boil. The evaporated milk helps to create a smooth, luscious texture that will set up nicely on the cold dessert.
2. Assemble and Chill: Once the chocolate topping is smooth and ready, carefully remove the pan with the frozen ice cream and peanut layer from the freezer. Pour the warm chocolate topping evenly over the peanut layer, spreading it gently to cover the entire surface. Work quickly, as the cold ice cream will begin extract to set the chocolate.
3. Final Freeze: Once the chocolate topping has been spread, immediately return the dessert to the freezer. Allow it to freeze for at least 4 hours, or preferably overnight, to ensure it’s completely firm and ready to slice. This extended freezing time is essential for achieving clean, neat slices of your magnificent Buster Bar.
When you’re ready to serve, allow the Buster Bar to sit at room temperature for about 5-10 minutes before slicing to make it easier to cut. Use a sharp knife dipped in hot water for the cleanest cuts. Enjoy every delicious bite of your homemade Buster Bar Ice Cream Dessert!
Conclusion:
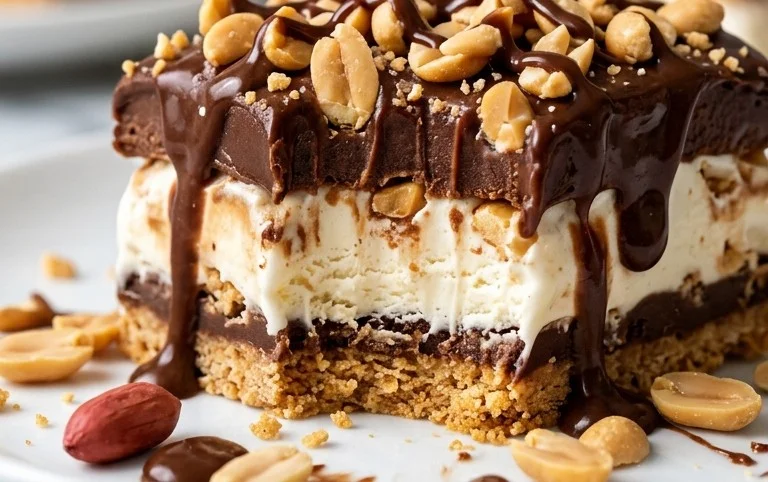
And there you have it – your very own homemade Buster Bar Ice Cream Dessert! This recipe truly delivers on all fronts, offering a delightful balance of creamy ice cream, crunchy chocolate coating, and a chewy, peanut-butter-infused core. It’s incredibly satisfying to recreate that beloved treat from scratch, and the aroma alone as it chills is enough to make your mouth water. I genuinely believe this Buster Bar ice cream dessert is a showstopper, perfect for impressing guests or simply treating yourself to something special. Serve it up in scoops, or go full-on nostalgic and slice it into bars for that authentic experience. Don’t be afraid to experiment with variations; perhaps try a swirl of caramel in the ice cream layer, or switch the peanuts for chopped almonds for a different nutty crunch. I wholeheartedly encourage you to give this recipe a go. It’s a fun and rewarding project that promises delicious results!
Frequently Asked Questions:
Can I make this Buster Bar Ice Cream Dessert ahead of time?
Absolutely! This dessert is actually best made ahead. It needs several hours (or overnight) in the freezer to fully set, which makes it an ideal choice for parties or gatherings where you want to minimize last-minute fuss. Just make sure to wrap it tightly to prevent freezer burn.
What if I don’t have peanuts? Can I substitute them?
Yes, you can definitely substitute the peanuts! Chopped almonds, pecans, or even toasted walnuts would work wonderfully to provide that crunchy texture. You could also try omitting them entirely if you have allergies or simply prefer it without nuts.
How should I store any leftovers?
Leftovers should be stored in an airtight container in the freezer. It’s a good idea to wrap individual slices or bars in plastic wrap or parchment paper before placing them in the container to help maintain their texture and prevent them from sticking together. Enjoy your delicious Buster Bar Ice Cream Dessert!
Buster Bar Ice Cream Dessert
A delicious no-bake ice cream dessert layered with crushed Oreos, peanuts, and chocolate.
Ingredients
-
1 14.3 oz pkg. of Oreo cookies, crushed
-
1/2 C butter, melted
-
1/2 gal. vanilla ice cream, softened
-
1 lb. Spanish peanuts
-
2 C powdered confectioner’s sugar
-
12 oz semi sweet chocolate chips
-
1/2 C butter
-
12 oz evaporated milk
Instructions
-
Step 1
Crush Oreo cookies and mix with 1/2 cup melted butter. Press into the bottom of a 9×13 inch pan. -
Step 2
Spread softened vanilla ice cream evenly over the cookie crust. -
Step 3
Sprinkle Spanish peanuts evenly over the ice cream layer. -
Step 4
In a microwave-safe bowl, combine chocolate chips, 1/2 cup butter, evaporated milk, and powdered sugar. Heat in 30-second intervals, stirring until smooth and melted. -
Step 5
Pour the chocolate mixture over the peanut layer, spreading evenly to cover. -
Step 6
Freeze for at least 4 hours, or until firm. -
Step 7
Cut into squares and serve.
Important Information
Nutrition Facts (Per Serving)
It is important to consider this information as approximate and not to use it as definitive health advice.
Allergy Information
Please check ingredients for potential allergens and consult a health professional if in doubt.