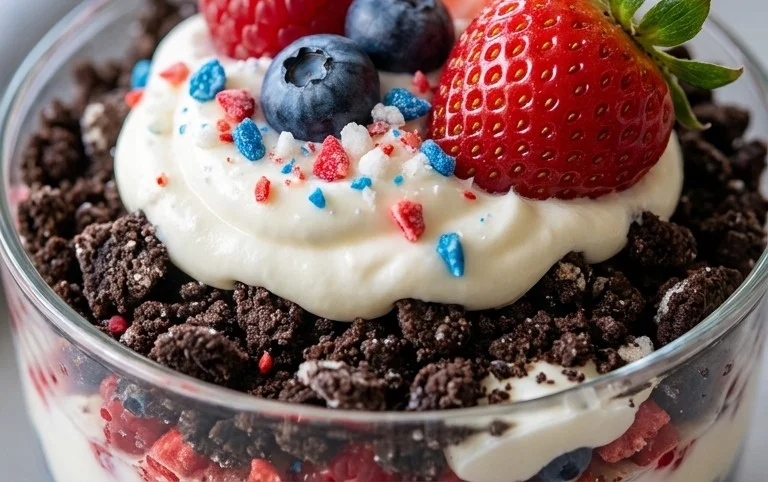
Red White Blue Dirt Cups- Easy Patriotic Dessert
Red, White and Blue Dirt Cups are more than just a dessert; they’re a nostalgic trip back to carefree summer days and backyard barbecues. This classic treat, with its fun, layered appearance and delightful texture, has captured hearts for generations. What is it about these seemingly simple Red, White and Blue Dirt Cups that makes them so universally loved? It’s the magical combination of creamy, chocolatey goodness, the satisfying crunch of crushed cookies, and the playful splash of patriotic colors that brings a smile to everyone’s face, from the youngest party-goers to the most seasoned dessert enthusiasts. They’re incredibly easy to assemble, making them a fantastic activity for kids to help with, and they always disappear in a flash. Get ready to create your own batch of these iconic Red, White and Blue Dirt Cups that are sure to be the star of your next gathering!

Red, White and Blue Dirt Cups
Get ready for a patriotic treat that’s as fun to make as it is to eat! These Red, White and Blue Dirt Cups are the perfect dessert for any summer gathering, Fourth of July celebration, or just when you’re craving something deliciously festive. They’re wonderfully simple, requiring no baking, and are sure to be a hit with kids and adults alike. The combination of creamy pudding, chocolatey “dirt,” and tangy gummy worms creates a delightful texture and flavor explosion. Let’s dive in and create these star-spangled delights!
Ingredients:
Getting Started: Preparing Your “Dirt”
The foundation of our dirt cups is, of course, the “dirt.” This is where those delicious Oreo cookies come into play. For the best texture, I like to crush them finely enough to resemble dark soil, but with a few slightly larger crum extractbs for visual interest and a bit of crunch. You can achieve this by placing the Oreo cookies in a resealable plastic bag and using a rolling pin to gently crush them. Alternatively, a food processor can be used, but be careful not to over-process them into a paste. We want that gritty, crum extractbly effect. Set aside about ¼ cup of the crushed Oreos for topping later – this will give our cups an extra layer of “dirt” on top.
Crafting the Creamy Layers: White and Colored Pudding
Now, let’s get our pudding ready. This is a straightforward process, but paying attention to the consistency will ensure your dirt cups are perfectly creamy.
Step 1: Mixing the Base Pudding
In a large bowl, combine the contents of both cheesecake pudding boxes with the 4 cups of milk. Whisk vigorously for about two minutes, or until the pudding mixture is smooth and begin extracts to thicken. It’s important to whisk thoroughly to ensure there are no lumps and that the pudding is evenly combined. Let this mixture sit for about 5 minutes to allow it to set up slightly.
Step 2: Dividing and Coloring the Pudding
Once the base pudding has thickened a bit, we need to divide it into three portions to create our red, white, and blue layers. Carefully divide the pudding as evenly as possible into three separate bowls. Leave one bowl as is for our “white” layer.
In the second bowl, add the ¼ teaspoon of red gel food dye. Gel food coloring is preferred over liquid as it provides a more vibrant color without adding excess moisture that could make the pudding watery. Stir the red dye into the pudding until it is uniformly colored. You want a rich, vibrant red, so don’t be afraid to mix well.
In the third bowl, add the ¼ teaspoon of blue gel food dye. Similar to the red, stir thoroughly until the blue pudding is a consistent and bright color. Again, gel food coloring is key here for intense color.
Step 3: Assembling the Dirt Cups
This is where the fun really begin extracts – building our layered masterpieces! Grab your serving cups. Clear cups are ideal so you can see the beautiful layers. Start by spooning a layer of the crushed Oreo “dirt” into the bottom of each cup, about 1-2 tablespoons per cup, depending on the size of your serving dishes. This forms the base of our “dirt” landscape.
Next, carefully spoon a layer of the white pudding on top of the Oreo crum extractbs. Try to keep the layers distinct. Then, add a layer of the red pudding, followed by a layer of the blue pudding. Alternate the order of your colored puddings if you like, or stick to the red, white, and blue theme. For the most visually appealing result, try to make each layer about the same thickness. You can gently tap the cups on the counter to help settle the layers and minimize air pockets.
Step 4: Adding the Finishing Touches
Now it’s time to bring our dirt cups to life with more “dirt” and some fun gummy worms! Sprinkle a generous layer of the reserved crushed Oreo cookies over the top of the blue pudding layer. This creates that iconic “dirt” look and adds a delightful crunch.
Finally, the crowning glory: the gummy worms! Take your red and blue gummy worms and artfully place them on top of the “dirt,” sticking them out as if they are emergin extractg from the soil. You can position them to look like they are crawling around or peeking out. This is where you can get creative and make each dirt cup unique!
Step 5: Chilling and Serving
Once your dirt cups are assembled and decorated, cover them loosely with plastic wrap or lids. It’s crucial to refrigerate them for at least 30 minutes to allow the pudding to set completely and the flavors to meld. The longer they chill, the firmer the pudding will become, making them easier to eat. I find that an hour in the refrigerator is ideal for achieving the perfect consistency. Serve them chilled, and watch them disappear as your guests enjoy this whimsical and delicious patriotic dessert. These are best enjoyed the same day they are made, but can be stored in the refrigerator for up to two days. Enjoy your Red, White and Blue Dirt Cups!
Conclusion:
I hope you’ve enjoyed learning how to create these delightful Red, White and Blue Dirt Cups! This recipe is a guaranteed hit, perfect for any occasion that calls for a touch of festive fun. It’s incredibly easy to assemble, making it a fantastic activity to do with kids or a quick and impressive dessert for last-minute gatherings. The combination of creamy pudding, crunchy cookie crum extractbs, and sweet gummy worms is a classic for a reason, and the patriotic colors make it truly special. I encourage you to give these Red, White and Blue Dirt Cups a try; they’re sure to bring smiles all around!
These treats are incredibly versatile. Serve them as is for an adorable and portable dessert, or get creative with your presentation. They’re perfect for picnics, barbecues, birthday parties, or even as a fun classroom treat. For variations, feel free to experiment with different pudding flavors like vanilla or cheesecake, or swap out the chocolate cookies for grabeef ham crackers for a lighter crunch. You could also add fresh berries like strawberries and blueberries for an extra burst of flavor and color.
Frequently Asked Questions:
Q1: Can I make these Red, White and Blue Dirt Cups ahead of time?
Absolutely! You can prepare the pudding and crush the cookies a day in advance. Assemble the dirt cups a few hours before serving to ensure the cookies retain some of their crunch. Store them covered in the refrigerator.
Q2: What if I don’t have gummy worms?
No worries at all! If you can’t find gummy worms, you can use other candies like Swedish Fish, candy rocks, or even just top with whipped cream and a sprig of mint for a pop of green.
Red, White and Blue Dirt Cups
A festive and fun dessert layered with creamy cheesecake pudding, crushed Oreos, and patriotic gummy worms.
Ingredients
-
2 boxes cheesecake pudding (3.4 ounces each)
-
4 cups milk
-
19 Oreo cookies (crushed)
-
¼ teaspoon red gel food dye
-
¼ teaspoon blue gel food dye
-
8 red and blue gummy worms
Instructions
-
Step 1
In a large bowl, whisk together the cheesecake pudding mix and milk until well combined and smooth. -
Step 2
Divide the pudding mixture into three equal portions. -
Step 3
Tint one portion of pudding with red gel food dye and another portion with blue gel food dye. Leave the third portion white. -
Step 4
In clear cups or jars, create layers by spooning in crushed Oreo cookies, then a layer of white pudding, followed by another layer of crushed Oreos, then red pudding, then Oreos, and finally blue pudding. -
Step 5
Sprinkle a final layer of crushed Oreos on top of each cup to resemble dirt. -
Step 6
Garnish each dirt cup with red and blue gummy worms, pushing them into the “dirt” layer. -
Step 7
Refrigerate for at least 15 minutes before serving to allow the pudding to set.
Important Information
Nutrition Facts (Per Serving)
It is important to consider this information as approximate and not to use it as definitive health advice.
Allergy Information
Please check ingredients for potential allergens and consult a health professional if in doubt.