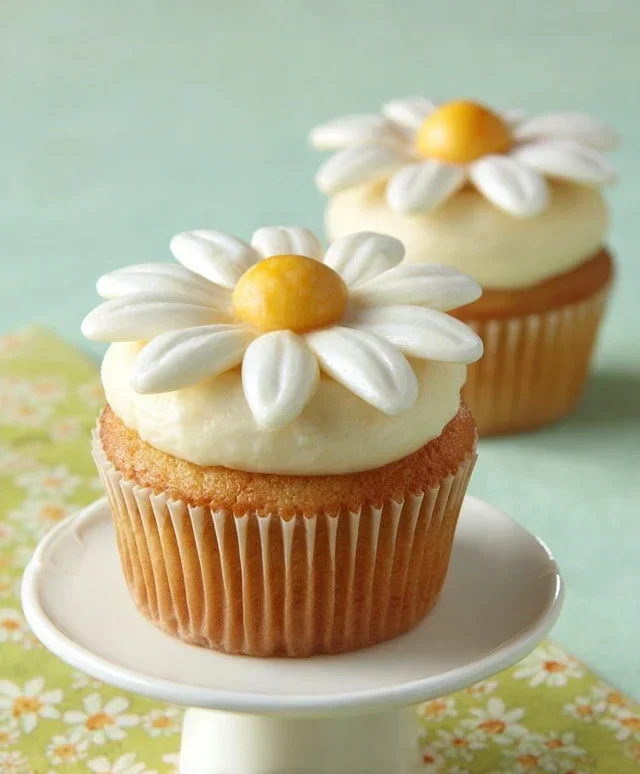
Super Cute Daisy Cupcakes – Easy & Adorable Dessert
Super Cute Daisy Cupcakes are more than just a sweet treat; they’re little rays of sunshine waiting to brighten your day! Imagin extracte delicate, fluffy vanilla cupcakes topped with a swirl of buttercream frosting and adorned with the sweetest, most charming daisy decorations. It’s no wonder these delightful creations are a perennial favorite for birthdays, spring gatherings, or simply when you need a little dose of adorable happiness.
What truly sets these Super Cute Daisy Cupcakes apart is their irresistible charm. They’re incredibly photogenic, making them perfect for sharing on social media, but their real magic lies in their taste – light, airy, and perfectly sweet, they’re a joy to devour. Whether you’re a seasoned baker or a kitchen novice, these cupcakes are designed to bring smiles and a sense of accomplishment. Get ready to spread some floral cheer with these exceptionally cute daisy cupcakes!

Super Cute Daisy Cupcakes
Get ready to brighten your day with these absolutely adorable Super Cute Daisy Cupcakes! These little beauties are perfect for parties, special occasions, or just because you want to add a pop of sunshine to your afternoon. The cupcakes themselves are wonderfully moist and tender, with a hint of vanilla that makes them utterly irresistible. And the daisy frosting? It’s not just pretty; it’s a creamy, dreamy delight that’s surprisingly easy to achieve. Let’s dive in and create some edible art!
Ingredients:
For the Buttermilk Substitution:
If you don’t have buttermilk on hand, don’t worry! You can easily make your own. For every 140 ml of buttermilk needed, simply take 140 ml of regular milk and stir in 1 tablespoon of white vinegar or lemon juice. Let it sit for about 5-10 minutes until it looks slightly curdled. It’s ready to use!
For the Cupcakes:
For the Daisy Frosting:
Decorating Your Super Cute Daisy Cupcakes:
Once your cupcakes are completely cool, it’s time to transform them into adorable daisies! You’ll want a piping bag fitted with a small round tip (for the center) and a larger petal tip (or you can use a star tip for a similar effect if you don’t have a petal tip). You could also just use a spatula if you prefer a more rustic look.
These Super Cute Daisy Cupcakes are guaranteed to be a hit. Enjoy the process of decorating and, most importantly, enjoy eating these delightful creations!
Conclusion:
And there you have it – your guide to creating the most absolutely adorable and delicious Super Cute Daisy Cupcakes! These little beauties are so much more than just a dessert; they’re a sunshine-filled treat perfect for brightening any occasion. Whether you’re baking for a birthday party, a baby shower, or just because you deserve a sweet pick-me-up, these cupcakes are guaranteed to bring smiles. The simplicity of the vanilla cake and the whimsical daisy decorations make this a recipe I know you’ll return to again and again. They’re wonderful served alongside a refreshing glass of lemonade, or as a delightful centerpiece for a picnic spread. Don’t be afraid to get creative with your daisy designs – a little touch of edible glitter can add an extra sparkle! I truly hope you enjoy making and sharing these charming cupcakes as much as I do. Give them a try – I promise you won’t be disappointed!
Frequently Asked Questions:
Can I make these cupcakes ahead of time?
Yes, you absolutely can! Baked and cooled cupcakes can be stored in an airtight container at room temperature for up to 2 days. For longer storage, refrigerate them, but bring them back to room temperature before decorating for the best texture.
What if I don’t have yellow candy melts for the centers?
No problem at all! You can use yellow frosting, a small dollop of lemon curd, or even a tiny piece of yellow fondant to create the center of your daisies. The key is just to add a pop of color!
Are these cupcakes suitable for kids to help make?
Definitely! This is a fantastic recipe for getting little hands involved. They can help measure ingredients, stir the batter (with supervision, of course!), and especially have a blast decorating the finished cupcakes with the frosting and candy melt centers.
Super Cute Daisy Cupcakes
Delightful vanilla cupcakes topped with adorable and colorful daisy frosting.
Ingredients
-
140 ml Buttermilk
-
120 g Soft unsalted butter
-
150 g Granulated sugar
-
2 Eggs
-
1 tbsp Vanilla extract
-
160 g All purpose flour
-
20 g Corn starch
-
1 tsp Baking powder
-
½ tsp Baking soda
-
1 pinch Salt
-
160 g Cream cheese
-
100 g Soft unsalted butter
-
300 g Icing sugar
-
1 tsp Vanilla extract
-
Yellow food coloring
-
Orange food coloring
Instructions
-
Step 1
Preheat oven to 180°C (350°F) and line a muffin tin with paper liners. -
Step 2
In a large bowl, cream together the soft unsalted butter and granulated sugar until light and fluffy. Beat in the eggs one at a time, then stir in the vanilla extract. -
Step 3
In a separate bowl, whisk together the all-purpose flour, corn starch, baking powder, baking soda, and salt. Gradually add the dry ingredients to the wet ingredients, alternating with the buttermilk, beginning and ending with the dry ingredients. Mix until just combined. -
Step 4
Divide the batter evenly among the prepared muffin cups, filling each about two-thirds full. Bake for 18-20 minutes, or until a toothpick inserted into the center comes out clean. -
Step 5
Let the cupcakes cool in the tin for a few minutes before transferring them to a wire rack to cool completely. -
Step 6
For the frosting, beat the room-temperature cream cheese and soft unsalted butter together until smooth. Gradually add the icing sugar, beating until light and fluffy. Stir in the vanilla extract. -
Step 7
Divide the frosting into three portions. Tint one portion yellow and another orange. Leave the third portion white. -
Step 8
To decorate, pipe or spread the white frosting onto the cooled cupcakes. Then, use yellow and orange frosting to create the daisy petals around the edge of the white center.
Important Information
Nutrition Facts (Per Serving)
It is important to consider this information as approximate and not to use it as definitive health advice.
Allergy Information
Please check ingredients for potential allergens and consult a health professional if in doubt.