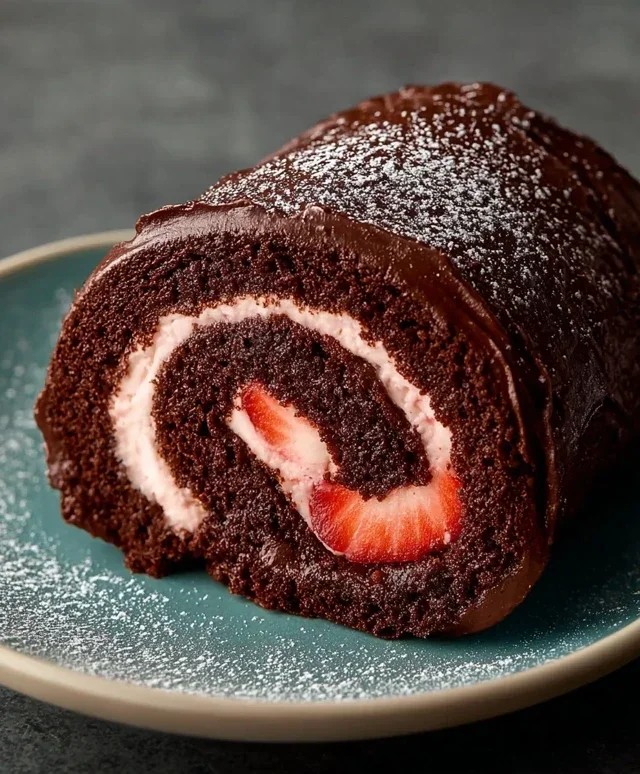
Peanut Butter Cup Chocolate Roll Cake Recipe
Peanut Butter Cup Chocolate Roll Cake is not just a dessert; it’s a nostalgic journey wrapped in decadent layers of pure bliss. If you, like me, have a soft spot for that irresistible combination of rich chocolate and creamy peanut butter, then this is the recipe you’ve been dreaming of. We’re talking about a fluffy, intensely chocolatey sponge cake, baked to perfection, then generously slathered with a luscious peanut butter frosting. The magic truly happens when you roll it all up, creating those beautiful spirals that promise an explosion of flavor with every single bite. This isn’t your average cake; it’s a showstopper that’s surprisingly simple to make, yet tastes like it came from a high-end bakery. Get ready to impress yourself and everyone lucky enough to share a slice of this incredible Peanut Butter Cup Chocolate Roll Cake!
Get Ready for a Flavor Sensation!
The Ultimate Comfort Dessert You Need in Your Life.
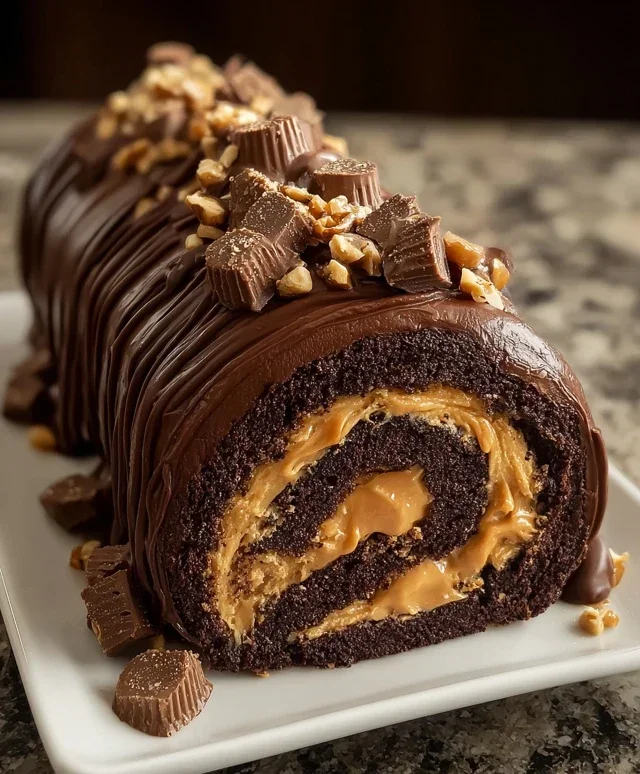
Peanut Butter Cup Chocolate Roll Cake
Get ready to impress yourself and your loved ones with this decadent Peanut Butter Cup Chocolate Roll Cake! This dessert is a delightful marriage of rich chocolate, creamy peanut butter, and a light, airy sponge cake that rolls up like a dream. It’s perfect for special occasions, holidays, or simply when you’re craving something truly extraordinary. Don’t be intimidated by the “roll cake” aspect; I’ll guide you through each step, and I promise, the result will be worth every bit of effort.
Ingredients:
Cake Batter Preparation
The foundation of our spectacular roll cake is a light and tender chocolate sponge. We’ll start by preheating our oven and preparing our baking sheet. This is a crucial step to ensure the cake bakes evenly and releases easily. Line a 10×15 inch jelly roll pan with parchment paper, extending the paper up the sides. This creates a helpful “sling” for lifting the cake out later.
In a medium bowl, whisk together the all-purpose flour, unsweetened cocoa powder, baking powder, and salt. This dry ingredient mixture will be sifted into our wet ingredients to ensure a lump-free batter.
In a large bowl, beat the large eggs and granulated sugar together until they are pnon-alcoholic ale yellow and have increased in volume, forming ribbons when the beaters are lifted. This process, called whipping or creaming, incorporates air into the eggs, which is essential for the cake’s lightness. I like to use an electric mixer for this, starting on low speed and gradually increasing to high until the mixture is thick and fluffy, which usually takes about 5-7 minutes.
Now, gently fold the dry ingredients into the whipped egg mixture in two additions. Be careful not to overmix at this stage; we want to preserve as much of that incorporated air as possible. Folding ensures the dry ingredients are evenly distributed without deflating the batter.
Pour the batter onto the prepared baking sheet and spread it evenly with an offset spatula. Aim for a uniform thickness so that the cake bakes evenly.
Baking and Cooling
Bake the cake in the preheated oven for approximately 12-15 minutes, or until a toothpick inserted into the center comes out clean. The cake should be springy to the touch. Overbaking will make the cake brittle and more prone to cracking when rolled.
As soon as the cake comes out of the oven, carefully invert it onto a clean kitchen towel that has been lightly dusted with powdered sugar. This is a critical step for preventing cracks. The warm cake is more pliable, and the powdered sugar on the towel acts as a gentle release agent. Carefully peel off the parchment paper from the back of the cake. Now, with the help of the towel, tightly roll up the cake, starting from one of the short ends. Let it cool completely in this rolled shape. This pre-shaping helps the cake retain its rolled form once filled.
Peanut Butter Frosting and Filling
While the cake is cooling, let’s prepare the luscious peanut butter filling. In a medium bowl, combine the smooth peanut butter and heavy cream. Beat them together until the mixture is smooth and well combined. It might look a little separated at first, but keep beating, and it will come together into a creamy, spreadable consistency.
In a separate bowl, beat the remaining 1 cup of powdered sugar with the peanut butter and cream mixture until it becomes a fluffy frosting. You can adjust the consistency by adding a little more powdered sugar if it’s too thin, or a tiny splash of milk if it’s too thick.
Assembly and Rolling
Once the cake has cooled completely, carefully unroll it. The cake should be flexible and ready to fill. If you notice any slight cracks, don’t worry; the frosting will cover them beautifully.
Spread the peanut butter frosting evenly over the surface of the unrolled cake, leaving a small border along the edges. Sprinkle the chopped mini peanut butter cups over the frosting.
Now, carefully re-roll the cake, this time without the towel, from the same short end you started with. Gently tuck in the edges as you roll to create a neat spiral. If the cake cracks a little more during this final roll, just press gently to encourage it to hold its shape.
Finishing Touches
For the final flourish, dust the top of the roll cake generously with the remaining 1/4 cup of powdered sugar. You can also add a few extra chopped peanut butter cups on top for decoration. Chill the cake in the refrigerator for at least 30 minutes before slicing. This allows the filling to set, making it easier to cut clean slices.
Slice the cake using a sharp knife, wiping the blade between each cut for the neatest presentation. Enjoy your homemade Peanut Butter Cup Chocolate Roll Cake – a true masterpiece of flavor and texture!

Conclusion:
You’ve just learned how to create a truly show-stopping dessert: the Peanut Butter Cup Chocolate Roll Cake! This recipe is fantastic because it perfectly balances the rich, decadent flavor of chocolate with the irresistible creaminess and nutty sweetness of peanut butter. It’s surprisingly achievable, even for less experienced bakers, and the visual appeal is undeniable. Imagin extracte presenting this beautifully swirled cake at your next gathering – it’s guaranteed to be a crowd-pleaser!
Serving this Peanut Butter Cup Chocolate Roll Cake is a joy in itself. A simple dusting of cocoa powder or powdered sugar is elegant, or you can go all out with a drizzle of chocolate ganache and chopped peanut butter cups. It pairs wonderfully with a glass of cold milk, a scoop of vanilla ice cream, or even a dollop of whipped cream. For variations, consider adding a layer of mini peanut butter cups inside the roll for extra texture, or swirl some peanut butter into the chocolate frosting for an intensified flavor. Don’t be afraid to experiment and make this recipe your own! I truly encourage you to give this delightful Peanut Butter Cup Chocolate Roll Cake a try. You won’t regret it!
Frequently Asked Questions:
Can I make this roll cake ahead of time?
Yes, absolutely! You can bake and fill the cake roll up to a day in advance. Wrap it tightly in plastic wrap and refrigerate. Let it sit at room temperature for about 30 minutes before slicing to allow the frosting to soften slightly for easier cutting.
My cake cracked when I rolled it, what did I do wrong?
Don’t worry, a little cracking is common with roll cakes! Ensure you’re not overbaking the cake – it should still be slightly flexible. Also, be sure to generously dust the parchment paper with powdered sugar or cocoa powder before inverting the cake. Rolling it while it’s still warm, but not hot, is also key. Even with a small crack, the frosting will cover it beautifully!
Can I use a different kind of nut butter?
While this recipe is specifically designed for the classic peanut butter cup flavor, you could experiment with other nut butters like almond butter or cashew butter. However, the taste and texture will be different from the intended Peanut Butter Cup Chocolate Roll Cake profile.
Peanut Butter Cup Chocolate Roll Cake
A decadent chocolate sponge cake rolled with a creamy peanut butter filling and studded with chopped peanut butter cups.
Ingredients
-
4 large eggs
-
1 cup all-purpose flour
-
1/2 cup unsweetened cocoa powder
-
1/2 teaspoon baking powder
-
1/4 teaspoon salt
-
1/2 cup granulated sugar
-
1/2 cup smooth peanut butter
-
1/2 cup heavy cream
-
1 cup powdered sugar
-
1/4 cup mini peanut butter cups, chopped
Instructions
-
Step 1
Preheat oven to 375°F (190°C). Line a 10×15 inch jelly roll pan with parchment paper and lightly grease. Dust with powdered sugar. -
Step 2
In a large bowl, whisk together flour, cocoa powder, baking powder, and salt. In a separate bowl, beat eggs and granulated sugar until pale and fluffy. -
Step 3
Gently fold the dry ingredients into the egg mixture until just combined. Spread batter evenly into the prepared pan. -
Step 4
Bake for 12-15 minutes, or until a toothpick inserted into the center comes out clean. Immediately invert the cake onto a clean kitchen towel dusted with powdered sugar. Peel off parchment paper and let cool completely. -
Step 5
While the cake cools, beat together peanut butter, heavy cream, and powdered sugar until smooth and creamy. -
Step 6
Spread the peanut butter filling evenly over the cooled cake, leaving a small border. Sprinkle with chopped peanut butter cups. -
Step 7
Starting from one of the longer sides, carefully roll up the cake with the filling. Wrap tightly in plastic wrap and refrigerate for at least 1 hour to set before slicing and serving.
Important Information
Nutrition Facts (Per Serving)
It is important to consider this information as approximate and not to use it as definitive health advice.
Allergy Information
Please check ingredients for potential allergens and consult a health professional if in doubt.