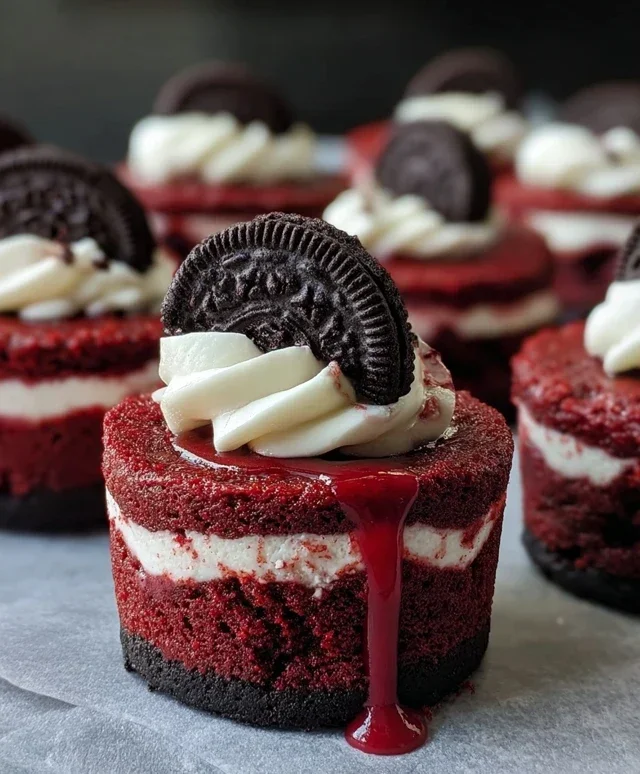
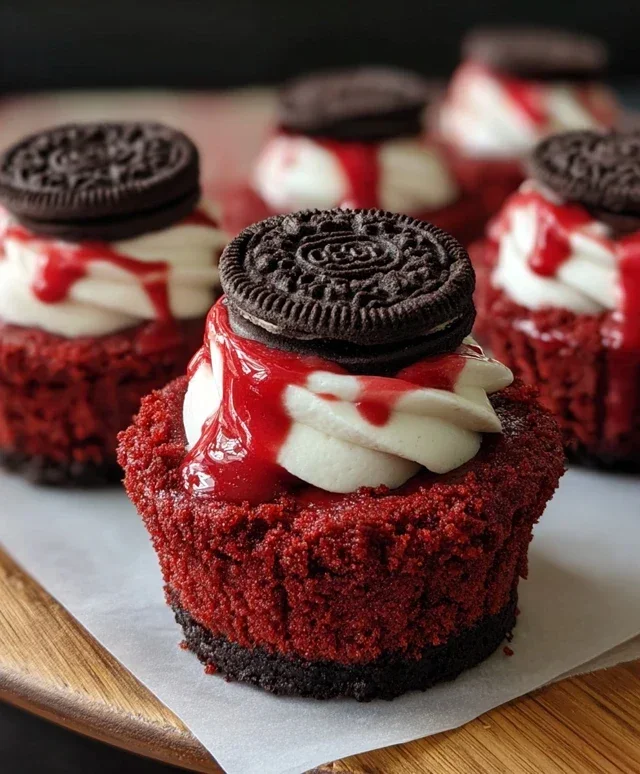
Mini Red Velvet Oreo Cheesecakes-Decadent Bites
Mini Red Velvet Oreo Cheesecakes are about to steal your heart and your taste buds! If you’re anything like me, the mere mention of red velvet and Oreo, let alone cheesecake, sends shivers of delight down your spine. These delectable bites are the ultimate indulgence, perfect for any occasion, from a quiet night in to a festive gathering. What makes these Mini Red Velvet Oreo Cheesecakes so utterly irresistible? It’s that magical marriage of textures and flavors: the rich, velvety cake notes dancing with the slightly bitter crunch of Oreo, all enveloped in a creamy, dreamy cheesecake filling. Each spoonful is a symphony of deliciousness, a testament to why we all adore this classic combination. Get ready to bake up a batch of pure joy!
Why You’ll Adore These Treats:
Perfectly Portioned Indulgence
A Crowd-Pleasing Flavor Combination
Surprisingly Easy to Make
Mini Red Velvet Oreo Cheesecakes
Get ready to impress your taste buds and your guests with these adorable and decadent Mini Red Velvet Oreo Cheesecakes! These little beauties are the perfect fusion of two classic treats: the rich, chocolatey goodness of Oreos and the iconic allure of red velvet cake, all nestled within a creamy, dreamy cheesecake. They’re surprisingly easy to make and are guaranteed to be a showstopper at any gathering, or simply a delightful indulgence for yourself. Let’s dive into how we’re going to create these miniature masterpieces.
Ingredients:
Crust Preparation
First, we’re going to tackle the delicious Oreo crust. This forms the perfect base for our cheesecake.
1. Preheat your oven to 350°F (175°C). You’ll also need to prepare your muffin tin. I find lining it with cupcake liners makes for the easiest cleanup and removal of the mini cheesecakes.
2. In a medium bowl, combine the 12 crushed Oreo cookies. You can do this by pulsing them in a food processor until they form fine crum extractbs, or by placing them in a Ziploc bag and using a rolling pin to crush them into fine crum extractbs. Next, add the 3 tablespoons of all-purpose flour, 1/2 cup of cocoa powder, 1/2 cup of granulated sugar, and a pinch of salt. Give these dry ingredients a good whisk to ensure they are well combined. Then, pour in the 1/4 cup of melted unsalted butter and 1 egg. Mix everything together until it resembles wet sand. This mixture will be sticky, which is exactly what we want for a firm crust.
3. Divide this Oreo crum extractb mixture evenly among 12 muffin cups, pressing it down firmly to form a compact crust. You can use the bottom of a small glass or a measuring spoon to help you press it down. Make sure to press it all the way to the sides of the liners as well. Pop the muffin tin into the preheated oven and bake for about 7-9 minutes, just until the crusts are set. This par-baking step helps prevent a soggy bottom. Once baked, remove from the oven and let them cool slightly while you prepare the cheesecake filling.
Red Velvet Cheesecake Filling
Now for the star of the show – the creamy, dreamy red velvet cheesecake filling!
4. In a large bowl, beat the 8 oz of softened cream cheese until it’s smooth and creamy. It’s crucial that your cream cheese is at room temperature for this step, as it will prevent lumps in your filling. Next, add the 1 egg, 1/4 cup of sour cream (also at room temperature), and 1/4 cup of granulated sugar. Beat these ingredients together until they are just combined and the mixture is smooth. Be careful not to overmix, as this can lead to cracking in your cheesecakes.
5. Now for the red velvet magic! Stir in the 1 tablespoon of cocoa powder and 1/2 teaspoon of vanilla extract. Finally, add a few drops of red gel food coloring. Gel food coloring is highly concentrated, so start with a small amount and add more until you achieve your desired vibrant red hue. Mix until the color is uniform throughout the filling. The gel coloring gives a much more intense and true red color compared to liquid food coloring.
Assembly and Baking
With our crusts prepped and filling ready, it’s time to bring it all together.
6. Carefully spoon the red velvet cheesecake filling evenly over the cooled Oreo crusts in the muffin tin. Fill each liner almost to the top. Once all the cups are filled, gently tap the muffin tin on the counter a few times. This helps to release any air bubbles that might be trapped in the filling, which can also contribute to cracking.
7. Now, it’s time to bake these mini delights. Place the muffin tin back into the oven at 350°F (175°C). Bake for approximately 18-22 minutes, or until the edges of the cheesecakes are set but the centers are still slightly jiggly. Overbaking will result in dry cheesecakes, so keep a close eye on them during the last few minutes of baking.
Cooling and Chilling
The final, and arguably the hardest, step is waiting for them to cool and chill to perfection. Patience is a virtue when it comes to cheesecake!
8. Once baked, carefully remove the muffin tin from the oven. Let the mini cheesecakes cool in the tin for about 10-15 minutes. Then, gently lift them out of the tin using the cupcake liners and place them on a wire rack to cool completely to room temperature. After they have reached room temperature, cover the cheesecakes loosely with plastic wrap and refrigerate them for at least 4 hours, or preferably overnight. This chilling period is essential for the cheesecakes to set properly and for their flavors to meld beautifully.
These Mini Red Velvet Oreo Cheesecakes are a labor of love, but oh-so-worth-it. Serve them as is, or garnish with a dollop of whipped cream or a miniature Oreo for an extra touch of indulgence. Enjoy every bite of this delightful combination!
Conclusion:
I hope you’re as excited about these Mini Red Velvet Oreo Cheesecakes as I am! They truly are a showstopper, perfectly balancing the rich, tangy cream cheese filling with the decadent chocolatey crunch of Oreo crust and the iconic, vibrant hue of red velvet. The mini size makes them ideal for portion control (though you might find yourself reaching for seconds!) and they are incredibly impressive for any occasion, from intimate gatherings to festive celebrations. The combination of flavors and textures is simply divine, offering a delightful twist on classic cheesecake. I highly encourage you to give this recipe a try; I’m confident you’ll fall in love with them!
For serving, these mini cheesecakes are wonderful on their own, but a dollop of whipped cream, a scattering of chocolate shavings, or even a drizzle of raspberry sauce can elevate them even further. You can also experiment with variations; consider adding a touch of espresso powder to the red velvet batter for a mocha twist, or topping them with a white chocolate ganache for extra decadence. Get creative and make them your own!
Frequently Asked Questions:
Can I make these ahead of time?
Absolutely! These Mini Red Velvet Oreo Cheesecakes can be made up to 2 days in advance. Once cooled completely, store them in an airtight container in the refrigerator. This is a great way to reduce stress on the day of your event!
What if I don’t have mini cheesecake pans?
No problem! You can adapt this recipe by using a standard 9-inch springform pan. You’ll likely need to bake it for a slightly longer duration, so keep an eye on it and test for doneness by inserting a knife near the center – it should come out clean. Alternatively, you could line a muffin tin with cupcake liners, though the crust might be a little more challengin extractg to press in evenly.
Can I freeze these cheesecakes?
Yes, freezing is a great option. Ensure they are completely cooled. You can freeze them individually on a baking sheet until firm, then transfer them to a freezer-safe container or bag. Thaw them in the refrigerator overnight for the best texture.
Mini Red Velvet Oreo Cheesecakes
Decadent mini cheesecakes with a rich red velvet Oreo crust and a creamy, tangy filling. Perfect for a sweet treat.
Ingredients
-
12 Oreo cookies
-
1/4 cup unsalted butter, melted
-
8 oz cream cheese, room temperature
-
1 egg, room temperature
-
1/4 cup sour cream, room temperature
-
1/4 cup granulated sugar
-
1 tablespoon cocoa powder
-
1/2 teaspoon vanilla extract
-
Red gel food coloring
Instructions
-
Step 1
Preheat oven to 350°F (175°C). Line a 12-cup muffin tin with paper liners. -
Step 2
In a food processor, pulse Oreo cookies until finely ground. Add melted butter and pulse until combined. Press 1-2 tablespoons of the mixture into the bottom of each muffin liner to form the crust. -
Step 3
In a medium bowl, beat cream cheese until smooth. Add egg, sour cream, granulated sugar, cocoa powder, and vanilla extract. Beat until well combined and smooth. -
Step 4
Add red gel food coloring to the cream cheese mixture, a few drops at a time, until desired red velvet color is achieved. Mix until evenly colored. -
Step 5
Spoon or pipe the cream cheese filling over the Oreo crusts in each muffin liner, filling about 2/3 full. -
Step 6
Bake for 20-25 minutes, or until the edges are set and the centers are mostly set but still slightly jiggly. -
Step 7
Let the cheesecakes cool completely in the muffin tin on a wire rack, then refrigerate for at least 2 hours before serving.
Important Information
Nutrition Facts (Per Serving)
It is important to consider this information as approximate and not to use it as definitive health advice.
Allergy Information
Please check ingredients for potential allergens and consult a health professional if in doubt.