Easy Oreo Cake Balls-Irresistible No-Bake Treat
Oreo Cake Balls are the ultimate indulgence, a delightful bite-sized treat that’s guaranteed to vanish faster than you can say “more, please!” If you’re anything like me, the mere mention of “Oreo” conjures up feelings of pure, unadulterated joy. That iconic chocolate cookie, that creamy filling – it’s a flavor combination that’s simply irresistible. And when you transform those beloved cookies into these decadent little spheres? Well, that’s where the magic truly happens.
Why You’ll Adore Oreo Cake Balls
What makes Oreo Cake Balls so incredibly special? It’s their perfect balance of textures and intense chocolate-cookie flavor, all packed into a convenient, bite-sized package. They’re ridiculously easy to make, making them a fantastic project for bakers of all skill levels, and an absolute showstopper for parties, potlucks, or just a sweet afternoon pick-me-up. The satisfying crunch of the cookie pieces, the creamy richness of the “cake,” and the smooth chocolate coating create an experience that’s simply out of this world.
Oreo Cake Balls: A No-Bake Dreamy Treat
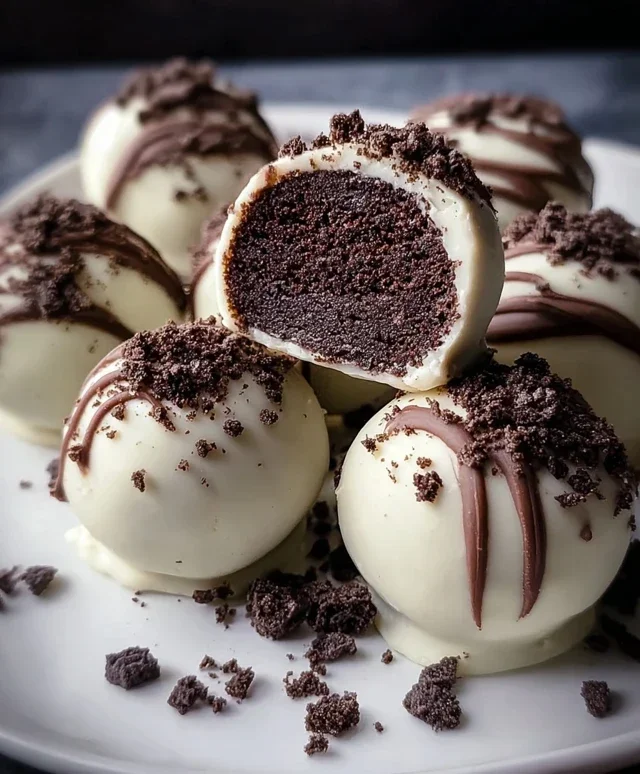
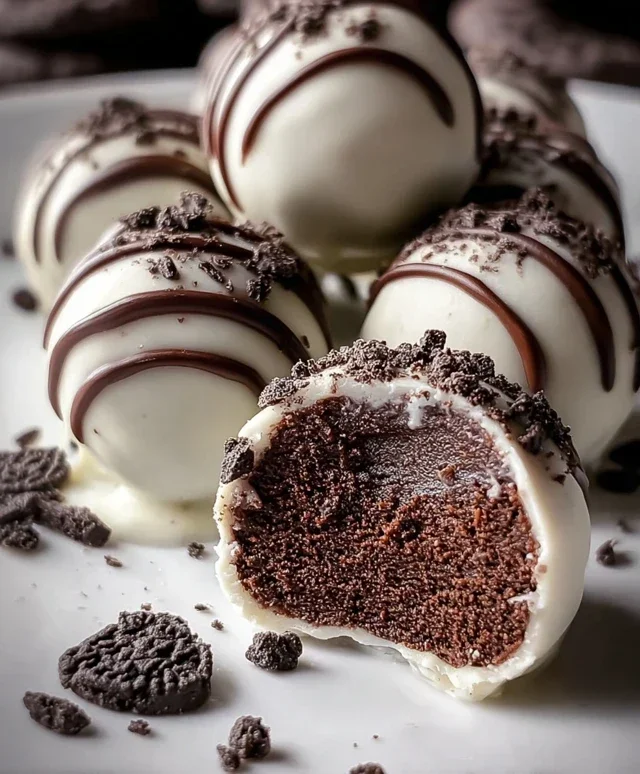
Get ready to dive into pure indulgence with these incredibly easy and ridiculously delicious Oreo Cake Balls. If you’re a fan of Oreos, and let’s be honest, who isn’t, then you’re going to fall head over heels for this no-bake dessert. They’re perfect for parties, a special treat, or just because you deserve something sweet. The best part? They require zero baking, making them accessible to even the most novice bakers. We’re talking about a creamy, dreamy center packed with crushed Oreo goodness, all coated in smooth white chocolate. Let’s get started on creating these little bites of heaven!
Ingredients:
Making the Oreo Base
The foundation of our Oreo Cake Balls is a simple yet incredibly satisfying mixture that combines the iconic flavor of Oreos with the creamy texture of cream cheese. This step is where all the magic begin extracts, transforming humble cookies into a delightful confectionary base.
1. Crush Those Cookies: The first crucial step is to finely crush your Oreo cookies. You can achieve this by placing them in a food processor and pulsing until they form fine crum extractbs. If you don’t have a food processor, a sturdy zip-top bag and a rolling pin work just as well. Just be sure to get them as fine as possible for the smoothest texture. Aim for crum extractbs that resemble coarse sand. This will ensure that your cake balls have a consistent and pleasant mouthfeel, without any large chunks of cookie interrupting the creaminess. Once crushed, set aside about 2 tablespoons of these crum extractbs for later, for a decorative sprinkle.
2. Combine with Cream Cheese: In a medium mixing bowl, combine the finely crushed Oreo crum extractbs (reserving those 2 tablespoons for later) with the softened cream cheese. Using softened cream cheese is absolutely key here; it will incorporate much more easily and prevent any lumps in your mixture. You can use a rubber spatula or your hands to thoroughly mix the two ingredients together. Continue to mix until a cohesive dough forms. It should be moist enough to hold together when you squeeze it, but not overly sticky. If the mixture feels a little dry, you can add another tablespoon of softened cream cheese, but be careful not to make it too wet, as this can make rolling the balls difficult. This mixture should resemble a thick, moldable dough.
Forming the Cake Balls
Now that we have our delicious Oreo and cream cheese base, it’s time to shape it into perfect little spheres. This is where your cake balls start to take their iconic form.
3. Roll into Balls: Take small portions of the Oreo mixture (about 1 tablespoon each) and roll them between your palms to form uniform balls. Aim for consistency in size so that they all bake (or rather, set) and coat evenly. A cookie scoop can be helpful here for ensuring consistent portion sizes. Place the rolled balls onto a baking sheet lined with parchment paper. The parchment paper is important because it prevents the balls from sticking and makes them easier to handle. Once all the mixture is rolled, place the baking sheet in the freezer for about 15-20 minutes. This chilling step is vital for firming up the balls, which will make them much easier to dip in the candy coating and prevent them from falling apart.
Melting and Dipping the Cake Balls
This is perhaps the most visually transformative stage, where our humble Oreo balls are coated in a luscious layer of white chocolate.
4. Melt the Candy Melts: While your Oreo balls are chilling, it’s time to prepare your white candy melt coating. Place the 10 oz of white candy melts in a microwave-safe bowl. Microwave on 50% power for 30-second intervals, stirring well after each interval, until the candy melts are completely smooth and melted. Be patient, as overcooking can cause the candy melts to seize up. If you find the melted coating is too thick to dip your balls smoothly, you can add the optional 2 tablespoons of heavy cream. Stir it in gradually until you achieve a pourable, but not watery, consistency. The goal is a smooth, glossy coating that will cling beautifully to your cake balls.
5. Dip and Decorate: Remove the chilled Oreo balls from the freezer. Working with a few at a time (so they don’t warm up too much), carefully drop each ball into the melted white candy coating. Use a fork or a dipping tool to ensure the ball is fully coated. Lift the ball out, allowing any excess coating to drip back into the bowl. Place the coated ball back onto the parchment-lined baking sheet. While the coating is still wet, sprinkle the reserved crushed Oreo cookies over the top of each ball. This adds a lovely visual contrast and an extra burst of Oreo flavor. For an extra touch of elegance and flavor, you can melt a small amount of semi-sweet chocolate chips (either in the microwave or using a double boiler) and drizzle it over the tops of the white chocolate-coated balls using a fork or a piping bag with a small tip. Once all the balls are dipped and decorated, let them sit at room temperature until the coating is completely set, or place them back in the refrigerator for about 10-15 minutes to speed up the process.
Enjoy these delightful Oreo Cake Balls! They are a true crowd-pleaser and incredibly satisfying to make.
Conclusion:
And there you have it – a simple yet incredibly decadent way to elevate your love for Oreos! This Oreo Cake Balls recipe is an absolute winner because it transforms a beloved cookie into a delightful, bite-sized treat that’s perfect for any occasion. The magic lies in its simplicity: minimal ingredients, straightforward steps, and an explosion of chocolatey goodness in every bite. They are wonderfully versatile, making them ideal for parties, bake snon-alcoholic ales, or simply satisfying a sweet craving. I truly encourage you to give this recipe a go; you won’t be disappointed!
For serving, these Oreo cake balls are fantastic on their own, arranged attractively on a platter. They also make a stunning addition to dessert tables, looking particularly festive when decorated with sprinkles or edible glitter. Consider them as a sweet surprise tucked into lunchboxes or as a thoughtful homemade gift for friends and family. For variations, feel free to get creative! You can experiment with different types of Oreos (like Golden Oreos or seasonal flavors) and coatings. White chocolate offers a beautiful contrast to the dark cookie, or try adding a swirl of colored candy melts for a pop of fun. The possibilities are truly endless!
Frequently Asked Questions about Oreo Cake Balls:
Can I make Oreo Cake Balls without cream cheese?
While cream cheese is the traditional binder that gives these Oreo cake balls their wonderfully fudgy texture, you can experiment with other binders if absolutely necessary. Some bakers have had success using a small amount of canned frosting (chocolate or vanilla works well) as a substitute. However, the texture might be slightly different, so be prepared for a bit of trial and error to achieve your desired consistency.
How should I store leftover Oreo Cake Balls?
Storing your delicious Oreo cake balls is straightforward. Once they’ve set completely, place them in an airtight container. They will keep well in the refrigerator for up to a week, maintaining their delightful texture and flavor. If you’ve used a chocolate coating, refrigeration also helps to keep it firm.
Oreo Cake Balls
Delicious no-bake Oreo cake balls, perfect for parties or a sweet treat. Made with crushed Oreos and cream cheese, coated in white chocolate.
Ingredients
-
24 Oreo cookies (regular size)
-
4 oz cream cheese, softened
-
10 oz white candy melts
-
2 tablespoons heavy cream (optional, for thinning)
-
Crushed Oreo cookies for sprinkling
-
Semi-sweet chocolate chips for drizzling
Instructions
-
Step 1
Crush the Oreo cookies (filling and all) into fine crumbs using a food processor or by placing them in a zip-top bag and crushing with a rolling pin. -
Step 2
In a medium bowl, mix the Oreo crumbs with the softened cream cheese until well combined and a dough-like consistency is formed. -
Step 3
Roll the mixture into small balls, about 1-inch in diameter. Place them on a parchment-lined baking sheet. -
Step 4
Melt the white candy melts according to package directions. If too thick, stir in heavy cream, 1 tablespoon at a time, until desired consistency is reached. -
Step 5
Dip each Oreo ball into the melted candy coating, ensuring it’s fully covered. Use a fork to lift and allow excess to drip off. -
Step 6
Place the coated balls back on the parchment-lined baking sheet. While the coating is still wet, sprinkle with crushed Oreo cookies. -
Step 7
Melt the semi-sweet chocolate chips and drizzle over the cake balls. Allow the coating to set completely at room temperature or in the refrigerator.
Important Information
Nutrition Facts (Per Serving)
It is important to consider this information as approximate and not to use it as definitive health advice.
Allergy Information
Please check ingredients for potential allergens and consult a health professional if in doubt.