
Crispy Baked Zucchini Chips- Easy Healthy Snack
Crispy Baked Zucchini Chips are a revelation, transforming a humble summer squash into an irresistible snack that will have you reaching for more. Forget greasy, soggy fried versions; these baked wonders offer a satisfying crunch without the guilt. We all know the struggle of having an abundance of zucchini during peak season, and this recipe is the ultimate solution for putting those garden gems to delicious use. What makes these Crispy Baked Zucchini Chips so special? It’s the perfect balance of tender, slightly sweet zucchini encased in a light, golden-brown crust that’s seasoned to perfection. They’re incredibly easy to make, making them ideal for a quick appetizer, a healthy side dish, or even a crowd-pleasing party snack. You’ll be amazed at how quickly they disappear, proving that simple ingredients, prepared thoughtfully, can create something truly extraordinary.
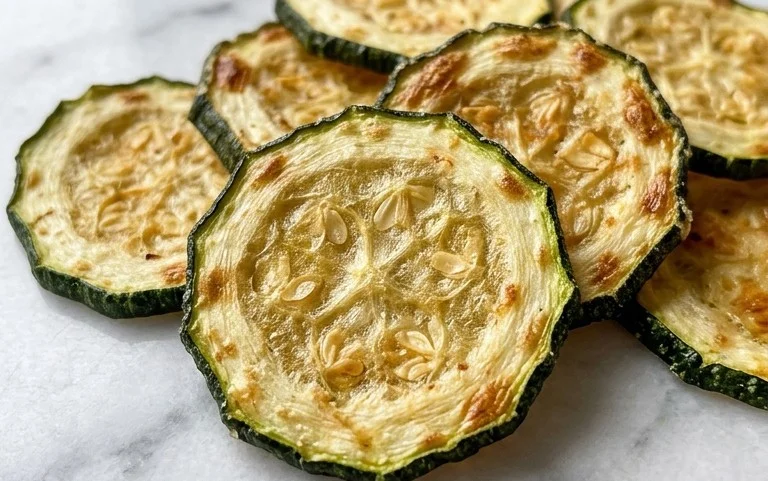
Crispy Baked Zucchini Chips
Looking for a healthy and delicious way to enjoy zucchini? These Crispy Baked Zucchini Chips are an absolute game-changer! Forget soggy, bland veggie snacks. My recipe transforms humble zucchini into incredibly addictive, crispy delights that are perfect for munching on their own, dipping, or even as a fun side dish. They’re so easy to make and taste so much better than anything you can buy pre-packaged. Plus, you control exactly what goes into them, making them a guilt-free indulgence.
The secret to perfectly crisp zucchini chips lies in two key steps: slicing them thinly and ensuring they’re dry before baking. Moisture is the enemy of crispiness, so don’t skip the pat-down! Baking at a moderate temperature allows them to dehydrate and crisp up without burning. I’ve found this method to be consistently successful, yielding golden-brown chips with just the right amount of crunch.
The seasoning is also crucial. I’ve opted for a simple yet flavorful blend of olive oil, salt, pepper, onion powder, and paprika. This combination provides a savory, slightly smoky depth that complements the mild flavor of the zucchini beautifully. You can absolutely experiment with other spices once you’ve mastered the basic recipe – garlic powder, Italian herbs, or even a pinch of cayenne for a little heat would be delicious additions. But for now, let’s stick to this tried-and-true combination.
Ingredients:
Cooking Instructions:
1.
Preparation and Slicing
First things first, we need to get our zucchini ready. Make sure your zucchini is thoroughly washed under cool running water and then completely dried. This is a really important step for achieving crispiness. Any residual moisture will steam the zucchini rather than bake it into a chip. You can use paper towels or a clean kitchen towel for this. Next, it’s time to slice. For the best results, I recommend using a mandoline slicer if you have one. This will ensure uniform, very thin slices, ideally about 1/16th of an inch thick. If you don’t have a mandoline, a sharp knife and a steady hand will work, but try your best to keep the slices as consistent as possible. Thicker slices will take longer to crisp up and might not reach that ideal crunch. Place your thinly sliced zucchini rounds on a layer of paper towels and then top with another layer of paper towels. Gently press down to absorb as much moisture as possible. Let them sit for about 5-10 minutes while you prepare the rest of your ingredients, changin extractg the paper towels if they become saturated.
2.
Seasoning the Zucchini
Now that our zucchini slices are as dry as can be, it’s time to season them. In a medium bowl, combine the dried zucchini slices. Drizzle the 1 tablespoon of olive oil over the zucchini. You want to make sure each slice gets a light coating of oil. Gently toss the zucchini with your hands or a spatula until evenly coated. Don’t overdo it with the oil; too much will make them greasy. In a separate small bowl, whisk together the ½ teaspoon kosher salt, ½ teaspoon black pepper, ¼ teaspoon onion powder, and ½ teaspoon paprika. This is where the flavor comes in! Sprinkle this spice mixture evenly over the oiled zucchini slices. Toss them gently again to ensure the seasonings are distributed across all the slices. This even coating is what will give each chip its delicious savory taste.
3.
Arrangin extractg for Baking
Preheat your oven to 400°F (200°C). This temperature is ideal for crisping without burning. Line two large baking sheets with parchment paper. Parchment paper is your friend here, as it prevents sticking and makes for easy cleanup. Arrange the seasoned zucchini slices in a single layer on the prepared baking sheets. It’s crucial that the slices do not overlap. If they are overlapping, they will steam each other and won’t get as crispy. You might need to use more than one baking sheet, or bake in batches. Give each chip a little breathing room so that hot air can circulate around them. This is another critical step for achieving that perfect crisp texture.
4.
The Baking Process
Place the baking sheets in the preheated oven. Bake for 10-15 minutes. During this time, keep a close eye on them, as they can go from perfectly crisp to burnt very quickly. After about 10-15 minutes, check on the chips. You’re looking for them to be lightly golden brown and feel dry to the touch. They will continue to crisp up as they cool. If they are not yet crisp enough, flip them over using a spatula or tongs and continue baking for another 5-10 minutes, or until they reach your desired level of crispness. Remember, oven temperatures can vary, so this timing is a guideline.
5.
Cooling and Enjoying
Once the zucchini chips are golden brown and crispy, carefully remove the baking sheets from the oven. Let the chips cool completely on the baking sheets. As they cool, they will firm up and become even crispier. This cooling period is just as important as the baking itself for achieving that satisfying crunch. Once they are completely cool, they are ready to be enjoyed! You can serve them immediately as a healthy snack. They’re fantastic on their own, or you can serve them with your favorite dips like hummus, ranch, or a garlic aioli. Store any leftovers in an airtight container at room temperature for a day or two, though they are definitely best enjoyed fresh for maximum crispness.
These Crispy Baked Zucchini Chips are a testament to how simple ingredients can create something truly special. They’re a fantastic way to use up an abundance of zucchini and a satisfying alternative to processed snacks. Give them a try – I’m confident you’ll be hooked!

Conclusion:
There you have it! These crispy baked zucchini chips are an absolute revelation. They’re incredibly easy to whip up, delightfully crunchy, and a fantastic way to enjoy fresh zucchini. I love how they offer a healthier alternative to traditional fried snacks without sacrificing any flavor or texture. The subtle sweetness of the zucchini combined with your chosen seasonings creates a truly satisfying bite that’s perfect for munching on while watching a movie, as an appetizer for guests, or even as a creative side dish. Don’t hesitate to give this recipe a try – you won’t be disappointed, and you might just find your new favorite healthy snack!
Feeling adventurous? Experiment with different spice blends! Smoked paprika and a pinch of cayenne pepper add a lovely smoky heat, while Italian herbs and garlic powder create a classic savory flavor profile. You can also serve these crispy baked zucchini chips with a variety of dips – a cool ranch, a zesty lemon-dill aioli, or even a spicy sriracha mayo all pair wonderfully. Get creative and make them your own!
Frequently Asked Questions:
Can I make these ahead of time?
While these zucchini chips are best enjoyed fresh out of the oven for maximum crispiness, you can bake them a few hours in advance and reheat them in a low oven (around 200°F or 95°C) for about 5-10 minutes to restore some of their crunch. However, their texture will be slightly softer than when freshly baked.
Why aren’t my zucchini chips crispy?
Several factors can contribute to less-than-crispy zucchini chips. Ensure you’re slicing the zucchini thinly and evenly. It’s crucial to pat the zucchini slices very dry after washing them, as excess moisture will steam them rather than bake them to a crisp. Also, make sure not to overcrowd the baking sheet, allowing for good air circulation around each chip.
Can I use other vegetables?
Absolutely! This baking method works wonderfully with other vegetables that have a similar texture. Thinly sliced sweet potatoes, butternut squash, or even bell peppers can be baked into delicious, crispy chips. Adjust baking times as needed based on the thickness and density of the vegetable.
Crispy Baked Zucchini Chips
Deliciously crispy baked zucchini chips, seasoned to perfection. A healthy and satisfying snack.
Ingredients
-
1 medium zucchini, washed and dried
-
1 tablespoon olive oil
-
½ teaspoon kosher salt
-
½ teaspoon black pepper
-
¼ teaspoon onion powder
-
½ teaspoon paprika
Instructions
-
Step 1
Preheat oven to 400°F (200°C). Line two baking sheets with parchment paper. -
Step 2
Slice the zucchini very thinly, about 1/16-inch thick. A mandoline slicer is recommended for uniform thickness. -
Step 3
In a large bowl, toss the zucchini slices with olive oil, kosher salt, black pepper, onion powder, and paprika until evenly coated. -
Step 4
Arrange the seasoned zucchini slices in a single layer on the prepared baking sheets, ensuring they do not overlap. -
Step 5
Bake for 10-15 minutes, flipping halfway through, until the edges are golden brown and crispy. -
Step 6
Remove from oven and let cool on the baking sheets for a few minutes. They will crisp up further as they cool.
Important Information
Nutrition Facts (Per Serving)
It is important to consider this information as approximate and not to use it as definitive health advice.
Allergy Information
Please check ingredients for potential allergens and consult a health professional if in doubt.