Cookie Monster Cake Jars – Fun Treat Ideas
Cookie Monster Cake Jars are more than just a dessert; they’re a delightful portal to pure, unadulterated joy! Who can resist the iconic blue hue and the whimsical charm of our favorite fuzzy friend? These individual layered treats capture the essence of everyone’s childhood obsession in a convenient and utterly delicious package. We’ve all got that sweet spot for a good cookie, and when you combine it with fluffy cake and creamy frosting, you’ve got a winning combination. What makes these Cookie Monster Cake Jars truly special is their playful presentation and the delightful explosion of flavors and textures in every single bite. They’re perfect for parties, a special treat to brighten your day, or even just to indulge your inner child. Get ready to dive into a jar of happiness!

Cookie Monster Cake Jars
Get ready to unleash your inner Cookie Monster with these absolutely adorable and unbelievably delicious Cookie Monster Cake Jars! These individual layered desserts are perfect for parties, as a fun treat for kids (and kids at heart!), or simply for indulgin extractg your sweet tooth in a truly spectacular way. We’re taking a classic cake mix and transforming it into a vibrant, cookie-filled masterpiece that’s as fun to assemble as it is to eat. Imagin extracte soft, fluffy cake, creamy blue frosting, and generous chunks of everyone’s favorite cookies – all layered up in a cute little jar. It’s a guaranteed crowd-pleaser and a fantastic way to bring a bit of playful joy to any occasion.
Let’s get baking (and assembling)!
Ingredients:
Baking the Cake
The first step in creating these delightful cake jars is to bake our cake.
1. Prepare the Cake Batter: Preheat your oven according to the cake mix box instructions. Grease and flour your baking pans – a 9×13 inch pan works wonderfully for this recipe, as we’ll be crum extractbling the cake later. In a large mixing bowl, combine the cake mix with the wet ingredients as directed on the box (usually eggs, oil, and water). Mix until just combined and smooth. Be careful not to overmix, as this can lead to a tough cake.
2. Bake the Cake: Pour the batter evenly into your prepared baking pan. Bake for the time recommended on the cake mix box, or until a toothpick inserted into the center comes out clean. Let the cake cool in the pan for about 10-15 minutes before inverting it onto a wire rack to cool completely. It’s crucial that the cake is fully cooled before you start crum extractbling it, otherwise, it might turn mushy and difficult to work with.
Making the Cookie Monster Frosting
Now, for the star of the show – that iconic, creamy, and vibrantly blue Cookie Monster frosting!
1. Cream the Butter and Shortening: In a large mixing bowl, cream together the softened unsalted butter and vegetable shortening until light and fluffy. This usually takes about 3-5 minutes with an electric mixer. This combination provides a wonderfully stable and smooth frosting base. Make sure your butter is truly at room temperature – not melted, but soft enough to easily indent with your finger.
2. Add Powdered Sugar and Vanilla: Gradually add the powdered sugar, about a cup at a time, mixing on low speed until incorporated. Scrape down the sides of the bowl as needed. Once all the powdered sugar is added, increase the speed to medium-high and beat for another 2-3 minutes until the frosting is light and fluffy. Stir in the vanilla extract.
3. Color the Frosting: Now for the fun part – the color! In a small separate bowl, place about one-third of the frosting. Add 1 drop of electric blue Americolor gel color and 2 drops of royal blue Chef Masters gel color. Mix thoroughly until you achieve a vibrant, true Cookie Monster blue. If you want a deeper shade, you can add another drop of each color, but be careful not to overdo it. The remaining two-thirds of the frosting will remain white, creating beautiful contrast.
Assembling the Cake Jars
This is where all the magic comes together! You’ll need 8-10 small jars or glasses for this. Mason jars are perfect, but any clear jar or glass will work.
1. Crum extractble the Cake and Cookies: Once the cake is completely cool, gently crum extractble it into a large bowl. You want nice, fluffy crum extractbles, not a fine powder. Add the first portion of chopped Oreos (10 Oreos, divided) to the crum extractbled cake. Gently toss to distribute the cookie pieces evenly throughout the cake crum extractbles.
2. Layering the Goodness: This is where we build our delicious cake jars. Start by placing a spoonful of your cake and cookie crum extractble mixture at the bottom of each jar. This will be our first layer. Next, add a generous dollop of your white frosting. Then, add another layer of the cake and cookie crum extractble mixture. Now, add a layer of the blue Cookie Monster frosting. Continue layering like this, alternating between cake crum extractble and frosting (white and blue), until your jars are almost full. You can even mix some of the blue and white frosting together for marbled swirls if you like!
3. The Grand Finnon-alcoholic ale and Decoration: For the top layer, finish with a swirl of blue frosting. Then, get creative with your cookie toppings! Sprinkle the remaining chopped Oreos and chocolate chip cookies over the blue frosting. Place two candy eyes on top of the frosting to give your cake jars that classic Cookie Monster look. You can even gently press a half chocolate chip cookie into the frosting for an extra touch. If you’re feeling fancy, tie a bit of blue ribbon around the rim of each jar. Refrigerate the cake jars for at least 30 minutes before serving to allow the flavors to meld and the frosting to set slightly. Enjoy your irresistible Cookie Monster Cake Jars!
Conclusion:
I hope you’re as excited as I am to dive into making these adorable and delicious Cookie Monster Cake Jars! These little jars are a fantastic way to serve up a fun, individual dessert that’s sure to bring smiles to any occasion. The combination of moist vanilla cake, creamy blue frosting, and crunchy cookie crum extractbles creates a delightful texture and flavor explosion. They’re perfect for parties, bake snon-alcoholic ales, or just a special treat for yourself. The individual portioning makes them incredibly convenient and less messy than a traditional cake, while still offering all the joy and fun. I truly encourage you to give this recipe a try – it’s a winner!
For serving suggestions, these Cookie Monster Cake Jars are wonderful on their own, but you can elevate them further by adding a dollop of whipped cream or a sprinkle of edible glitter. They also make fantastic party favors! As for variations, feel free to experiment with different cake flavors, like chocolate or funfetti, or even try a cookie dough frosting instead of the vanilla buttercream. The possibilities are endless!
Frequently Asked Questions about Cookie Monster Cake Jars:
Can I make these ahead of time?
Absolutely! You can assemble the cake jars up to 2 days in advance. Store them tightly covered in the refrigerator. The cake will soften slightly, but they’ll still be incredibly tasty!
What kind of jars are best to use?
Small mason jars or any clean, sturdy glass jars with lids work perfectly. About 4-6 ounce jars are ideal for individual servings. Just make sure they are thoroughly washed and dried before you begin extract layering your cake and frosting.
Can I make this recipe without food coloring?
Yes, you can omit the blue food coloring if you prefer a natural look. The cake and frosting will still be delicious! You could also use natural food colorings derived from fruits or vegetables for a colored effect.
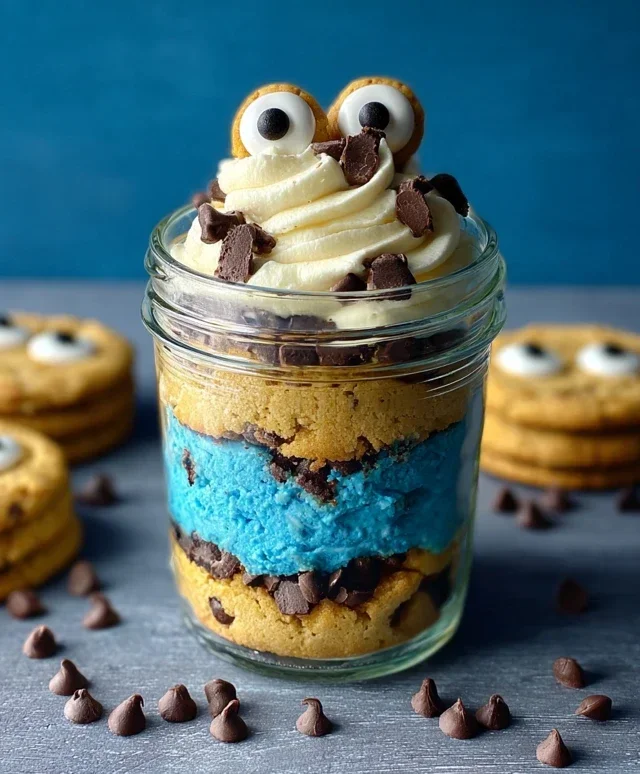
Cookie Monster Cake Jars
Delightful individual cake jars inspired by the beloved Cookie Monster, featuring blue cake, creamy frosting, and crushed cookies.
Ingredients
-
15 oz box white or vanilla cake mix
-
Ingredients called for on cake mix box (typically eggs, oil, and water)
-
10 Oreos, chopped (divided)
-
½ cup (1 stick) unsalted butter, room temperature
-
½ cup vegetable shortening
-
3 cups powdered sugar
-
2-3 tablespoons milk or coffee creamer
-
1 teaspoon vanilla extract
-
1 drop electric blue Americolor gel color
-
2 drops royal blue Chef Masters gel color
-
8-10 Oreos, chopped
-
8-10 chocolate chip cookies, chopped
-
8 candy eyes
-
2 chocolate chip cookies, cut in half
-
Blue ribbon (optional, for decorating jars)
Instructions
-
Step 1
Prepare the cake mix according to box directions. Add 1 drop of electric blue Americolor gel color and 2 drops of royal blue Chef Masters gel color to the batter and mix until evenly combined and a vibrant Cookie Monster blue. Bake the cake in a 9×13 inch pan or as directed on the box. Let cool completely. -
Step 2
While the cake cools, prepare the frosting. In a large bowl, cream together the softened butter and vegetable shortening until light and fluffy. Gradually add the powdered sugar, alternating with the milk or coffee creamer, beating until smooth and creamy. Stir in the vanilla extract. -
Step 3
Crumble the cooled cake into small pieces. In a separate bowl, combine the crumbled cake with half of the divided chopped Oreos, the chopped chocolate chip cookies, and about 1 cup of the frosting. Mix gently until just combined. -
Step 4
Layer the cake mixture into 6 small jars. Start with a layer of the cake and cookie mixture, followed by a layer of frosting. Repeat layers, ending with a frosting layer on top. -
Step 5
Decorate the top of each cake jar. Sprinkle the remaining chopped Oreos and chocolate chip cookies over the frosting. Place two candy eyes on each jar to resemble the Cookie Monster. Add a chocolate chip cookie half for a mouth if desired. -
Step 6
If using, tie a blue ribbon around the neck of each jar for a decorative touch. Chill the cake jars for at least 30 minutes before serving.
Important Information
Nutrition Facts (Per Serving)
It is important to consider this information as approximate and not to use it as definitive health advice.
Allergy Information
Please check ingredients for potential allergens and consult a health professional if in doubt.