Easy 4th of July Snack Mix Recipe- Patriotic Party Treat
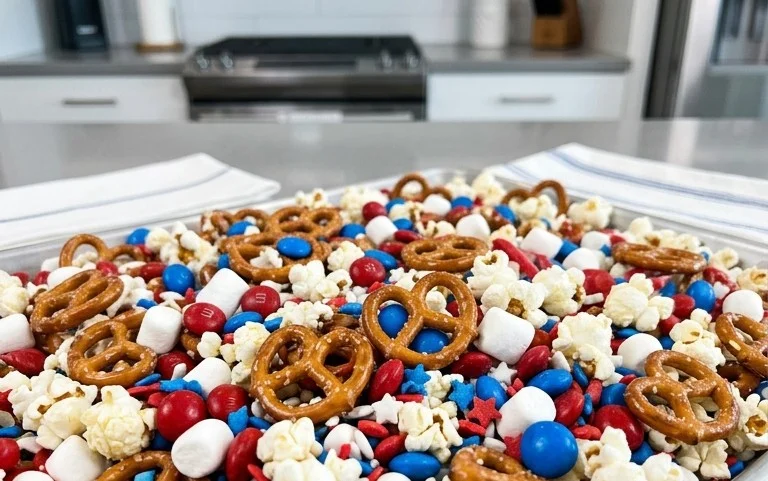
The 4th of July Snack Mix is your ultimate patriotic party pleaser, a guaranteed hit that will have everyone reaching for more. Forget boring chips and pretzels; this vibrant concoction is a symphony of textures and flavors, perfectly embodying the festive spirit of Independence Day. What makes this 4th of July Snack Mix so beloved? It’s the addictive blend of sweet, salty, crunchy, and chewy elements that keeps taste buds engaged. We’re talking about a medley of your favorite snackable treasures, all tossed together with a touch of red, white, and blue magic. It’s incredibly easy to make, allowing you to spend less time in the kitchen and more time celebrating with loved ones. This isn’t just any snack mix; it’s a customizable explosion of fun, designed to be the star of your picnic, barbecue, or fireworks viewing party.
4th of July Snack Mix: A Patriotic Pop of Flavor!
Get ready to celebrate the Fourth of July in style with this incredibly easy and outrageously delicious snack mix! This recipe is a guaranteed crowd-pleaser, perfect for barbecues, fireworks viewing parties, or just a fun afternoon with the family. The combination of crunchy cereals, salty pretzels, sweet white chocolate, and festive M&M’s is simply irresistible. Plus, the vibrant red, white, and blue colors make it the ultimate patriotic treat. This mix is so simple to throw together, you’ll have plenty of time to focus on the other important aspects of your holiday celebration. No fancy techniques or complicated steps here – just pure, unadulterated snacking joy!
Ingredients:
Instructions:
Step 1: Combine the Dry Ingredients
The first step to creating this delightful snack mix is to get all of our dry, crunchy components ready. Grab a really large mixing bowl – I mean, the biggest one you have! We need plenty of space to toss everything around without making a mess. Carefully measure out your Chex cereal (whether you choose corn or rice Chex, both offer a fantastic crispiness), the mini pretzel twists (if you’re using pretzel rods, just break them into bite-sized pieces), your Cap’n Crunch cereal (making sure it’s the plain version to keep those colors nice and bright), and the Honey Nut Cheerios. Gently pour all of these into your super-sized bowl. The goal here is to get a good, even distribution of all the different shapes and textures. Once they’re all in the bowl, give them a gentle stir with a large spoon or a spatula just to mix them up a bit. Don’t worry about being too precise at this stage; we’ll get everything coated soon enough!
Step 2: Melt the White Chocolate
Now for the magic ingredient that brings it all together: white chocolate! You have a couple of excellent options for melting your white chocolate chips. The most common and often the easiest method is using your microwave. Place the 1-1/2 bags (which equals about 2-3/4 cups) of white chocolate chips into a microwave-safe bowl. Add the 1-1/2 teaspoons of coconut oil or vegetable oil to the chips. The oil helps to make the chocolate smoother and less prone to seizing up. Microwave the chips on 50% power in 30-second intervals, stirring thoroughly after each interval. It’s crucial to stir well, as the residual heat will continue to melt the chocolate even after you take it out of the microwave. Be patient; white chocolate can be a bit more finicky than milk or dark chocolate, so avoid overheating it. Alternatively, you can use a double boiler. Fill the bottom pot of your double boiler with about an inch of water and bring it to a simmer. Place the white chocolate chips and oil in the top pot, ensuring the bottom of the top pot doesn’t touch the simmering water. Stir continuously until the chocolate is smooth and fully melted. Once melted and smooth, remove from heat immediately.
Step 3: Coat the Dry Ingredients
With your beautifully melted white chocolate ready, it’s time to coat our crunchy base. Carefully pour the melted white chocolate over the cereal and pretzel mixture in your large bowl. Now, using your large spoon or spatula, gently fold and toss everything together. The key here is to be as gentle as possible to avoid crushing the delicate cereals. You want to ensure that every single piece of cereal, pretzel, and cheerio gets a lovely coating of white chocolate. This might take a bit of maneuvering, so don’t be afraid to get in there and ensure even coverage. You’ll notice the ingredients start to clump together slightly as the chocolate coats them. This is exactly what we want! It creates those perfect little clusters of flavor that are so satisfying to munch on.
Step 4: Add the Festive Flair
This is where our snack mix truly transforms into a 4th of July showstopper! Once the dry ingredients are well coated in white chocolate, it’s time to introduce the stars of the show: the red, white, and blue M&M’s. Sprinkle the 1 cup of festive M&M’s over the coated mixture. If you’re using regular M&M’s and want to boost the patriotic colors, you can certainly add more! This is also the time to add the optional festive sprinkles. If you’re using them, sprinkle about 2 tablespoons of your red, white, and blue sprinkles over the mix. Again, use your spoon or spatula to gently fold and toss everything together until the M&M’s and sprinkles are evenly distributed throughout the mix. Try to incorporate them without breaking up the clusters that the white chocolate has formed. The vibrant colors of the M&M’s and sprinkles will now be interspersed with the creamy white chocolate and crunchy cereals, creating a visually stunning treat.
Step 5: Let it Set and Enjoy!
The final, and perhaps the hardest, step is waiting for the snack mix to set! Once everything is beautifully combined, spread the mixture out onto a large baking sheet lined with parchment paper or wax paper. This prevents sticking and makes for easy cleanup. You can spread it out in a single layer or leave it in looser clusters, depending on your preference. Allow the snack mix to sit at room temperature for at least 1-2 hours, or until the white chocolate has completely hardened. You can speed this process up slightly by placing the baking sheet in the refrigerator for about 30-45 minutes, but be careful not to leave it in too long, as condensation can sometimes form. Once fully set, break apart any large clumps into individual clusters or bite-sized portions. Store your finished 4th of July Snack Mix in an airtight container at room temperature for up to a week. This ensures it stays fresh and crunchy. Now, go ahead and serve it up! It’s the perfect patriotic snack for your holiday festivities!

Conclusion:
This 4th of July Snack Mix is an absolute crowd-pleaser, perfect for adding a festive and delicious touch to your Independence Day celebrations. Its combination of sweet, salty, and crunchy textures makes it incredibly satisfying, and the customizable nature ensures there’s something for everyone to love. I find it incredibly easy to whip up, making it ideal for busy hosts. Whether you’re heading to a backyard barbecue, a picnic in the park, or just enjoying fireworks from your porch, this snack mix is your go-to for effortless entertaining. Serve it in colorful bowls for a patriotic presentation, or bag it up for guests to take home as a sweet parting favor. Don’t hesitate to get creative with your own additions; think about adding dried cranberries for a tart burst, or perhaps some mini chocolate chips for an extra sweet indulgence.
I truly encourage you to give this recipe a try. It’s a simple yet impactful way to elevate your 4th of July festivities and create memorable moments with loved ones. Get ready for compliments!
Frequently Asked Questions:
Can I make this 4th of July Snack Mix ahead of time?
Absolutely! This snack mix is fantastic for making ahead. In fact, I usually make a big batch a day or two before the holiday. Store it in an airtight container at room temperature, and it will stay wonderfully fresh and crunchy.
What are some other ingredient variations I could try?
The possibilities are nearly endless! You could add pretzels, mini marshmallows, different types of nuts like almonds or pecans, or even some colorful candy-coated chocolates for an extra festive flair. Get creative and tailor it to your favorite flavors!
How should I store any leftover snack mix?
For any leftovers, simply transfer the snack mix to an airtight container or a resealable bag. Store it at room temperature away from direct sunlight and moisture. It should remain delicious for several days.
4th of July Snack Mix
A festive and easy-to-make snack mix perfect for your Fourth of July celebrations, featuring a blend of cereals, pretzels, M&M’s, and white chocolate.
Ingredients
-
2 cups Chex cereal (corn or rice)
-
1 cup mini pretzel twists
-
2 cups Cap’n Crunch cereal (without berries)
-
2 cups Honey Nut Cheerios cereal
-
1 cup red, white, and blue M&M’s
-
1-1/2 bags (16 ounces total) white chocolate chips
-
1-1/2 teaspoons coconut oil
-
2 tablespoons festive sprinkles
Instructions
-
Step 1
In a very large bowl, combine the Chex cereal, mini pretzel twists, Cap’n Crunch cereal, and Honey Nut Cheerios cereal. Stir gently to mix. -
Step 2
In a microwave-safe bowl, melt the white chocolate chips with the coconut oil. Microwave in 30-second intervals, stirring between each, until smooth and fully melted. -
Step 3
Pour the melted white chocolate mixture over the cereal and pretzel mixture in the large bowl. Stir gently until all the ingredients are evenly coated. -
Step 4
Add the red, white, and blue M&M’s and the festive sprinkles (if using) to the bowl. Fold them in carefully until distributed throughout the mix. -
Step 5
Spread the snack mix in a single layer on a large baking sheet lined with parchment paper or wax paper. This helps it cool and set properly. -
Step 6
Allow the snack mix to cool and harden completely at room temperature, about 15-20 minutes. -
Step 7
Once hardened, break apart any large clumps and serve.
Important Information
Nutrition Facts (Per Serving)
It is important to consider this information as approximate and not to use it as definitive health advice.
Allergy Information
Please check ingredients for potential allergens and consult a health professional if in doubt.