Ramen Eggs Ajitama- The Ultimate Flavor Bomb
Ramen eggs, also known as ajitama, are arguably one of the most beloved accoutrements to a steaming bowl of ramen, and for good reason! These perfectly marinated, jammy-yolked treasures elevate any noodle soup from delicious to truly divine. What’s not to adore? The tender, slightly yielding egg white soaks up the savory marinade, while the rich, creamy yolk adds an unparalleled depth of flavor and a luxurious texture. The magic of a perfectly prepared ramen egg lies in its transformation; a simple egg becomes a culinary marvel, infused with the essence of soy sauce, non-alcoholic mirin, and non-alcoholic sake. They offer a delightful burst of umami with every bite, making them an indispensable element for anyone looking to master the art of homemade ramen.
Why You’ll Love These Ramen Eggs:
The Perfect Jammy Yolk Every Time
A Flavor Bomb for Your Noodles
Surprisingly Simple to Make at Home
Ramen Eggs (Ajitama)
There’s something truly magical about a perfectly cooked ramen egg, also known as ajitama. That creamy, luscious yolk, infused with savory, slightly sweet marinade, is the crowning glory of any bowl of ramen. While it might seem intimidating, making these delicious additions at home is surprisingly simple and incredibly rewarding. Get ready to elevate your noodle game with this foolproof recipe.
Ingredients:
Making Your Ajitama: Step-by-Step
The process of creating perfect ramen eggs involves two main stages: achieving that ideal soft-boiled egg consistency and then allowing it to soak up all the delicious flavors of the marinade. Let’s break it down.
Stage 1: Boiling the Eggs to Perfection
The key to a great ramen egg is a perfectly soft-boiled egg. You want the white to be set, but the yolk to be gloriously jammy and runny. Here’s how I achieve that consistent result every time.
1. Prepare Your Boiling Water: Start by bringin extractg a medium saucepan of water to a rolling boil. For 6 eggs, I usually fill a pot about halfway full, ensuring there’s enough water to fully submerge the eggs. This is where the optional vinegar comes in. Adding a splash of white vinegar (about a teaspoon) to the boiling water can help the egg whites coagulate quickly if an egg cracks during boiling. It’s not strictly necessary, but it’s a good preventative measure.
2. Gently Introduce the Eggs: Once the water is at a vigorous boil, carefully lower your eggs into the water. I like to use a slotted spoon or a spider strainer to gently place each egg into the boiling water. This prevents them from cracking when they hit the hot liquid. Don’t overcrowd the pot; make sure the eggs have enough space.
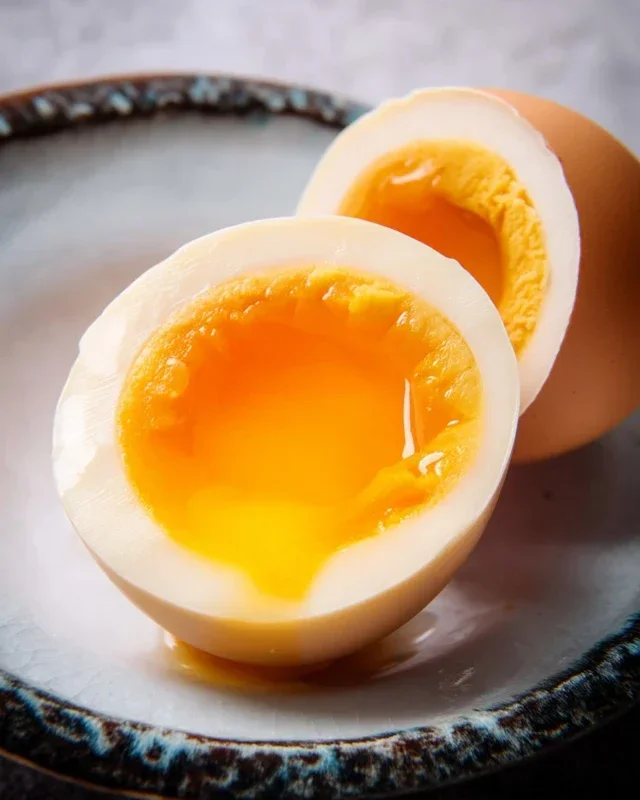
3. Timing is Crucial: This is where the magic happens. For that perfect jammy yolk, I boil the eggs for exactly 6 minutes and 30 seconds. Some people prefer 6 minutes for a slightly more runny yolk, or up to 7 minutes for a firmer, but still soft, yolk. Experiment with what you like best, but I find 6.5 minutes to be the sweet spot for a beautifully custardy center.
4. Immediate Ice Bath: As soon as the timer goes off, immediately remove the eggs from the boiling water using your slotted spoon or strainer. Transfer them directly into a bowl filled with ice water. This is a critical step. The ice bath shocks the eggs, halting the cooking process instantly and preventing the yolk from overcooking. It also makes the eggs easier to peel. Let them sit in the ice bath for at least 5-10 minutes, or until they are completely cool to the touch.
Stage 2: Marinating for Maximum Flavor
With your perfectly cooked eggs ready, it’s time to infuse them with the delicious ajitama marinade. This simple mixture transforms a basic soft-boiled egg into something truly special.
5. Prepare the Marinade: While your eggs are cooling, whisk together the soy sauce, water, non-non-non-alcoholic alternativeic non-alcoholic mirin, and granulated sugar in a small bowl or a resealable bag. Make sure the sugar is fully dissolved. The non-alcoholic mirin adds a subtle sweetness and depth, while the soy sauce provides the savory umami base. The water helps to dilute the intensity of the soy sauce, creating a balanced flavor.
6. Peel and Marinate: Once the eggs are cool enough to handle, carefully peel them. I find it easiest to peel them under cool running water, gently tapping the egg on a hard surface all around and then starting the peel from the wider end. Don’t worry if a little bit of the white sticks; the marinade will help to smooth that out. Place the peeled eggs into your marinade. If you’re using a resealable bag, pour the marinade in and then carefully add the eggs, squeezing out as much air as possible before sealing. If you’re using a container, ensure the eggs are submerged as much as possible.
7. Chill and Infuse: Seal your bag or container and refrigerate. For the best flavor, let the eggs marinate for at least 4 hours, but for truly deep flavor penetration, I recommend marinating them for 8-12 hours, or even overnight. The longer they marinate, the more intensely they will absorb the savory, sweet, and slightly salty flavors of the marinade. Give them a gentle turn or two every few hours if possible to ensure even marination.
Once your ajitama have marinated to your liking, they are ready to be enjoyed! Slice them in half lengthwise and admire that beautiful, custardy yolk before nestling them atop your favorite bowl of ramen. They also make a fantastic addition to rice bowls or as a standalone snack. Enjoy!
Note: The quality of your eggs can impact the cooking time slightly. Fresher eggs can sometimes be more difficult to peel. If you find your eggs are consistently hard to peel, consider using eggs that are a few days old.

Conclusion:
And there you have it! Making perfect Ramen Eggs, or Ajitama, is surprisingly simple and incredibly rewarding. These marinated soft-boiled eggs are a game-changer for any ramen bowl, offering a burst of savory, umami flavor and a beautifully jammy yolk that melts into the broth. They elevate your homemade ramen from delicious to restaurant-quality in just a few simple steps. Don’t be intimidated by the marinating process; it’s mostly hands-off and the results are well worth the wait. I truly encourage you to give this recipe a try – it’s a staple in my kitchen and I know you’ll love them too!
Think beyond ramen, too! These flavorful eggs are fantastic sliced over rice bowls, in bento boxes, or even just enjoyed as a satisfying snack. For variations, feel free to experiment with different soy sauce bases like tamari for a gluten-free option, or add a splash of non-alcoholic mirin or non-alcoholic sake to the marinade for extra depth. A pinch of sugar can balance the saltiness, and a sliver of gin extractger or garlic can add a subtle aromatic kick. Once you master the basic recipe, the possibilities are endless.
Frequently Asked Questions about Ramen Eggs (Ajitama):
How long do Ramen Eggs last in the refrigerator?
Once marinated, your delicious Ramen Eggs will keep in the refrigerator for about 3-4 days. Make sure they are stored in an airtight container with some of their marinade to maintain their flavor and moisture.
Can I use a different type of soy sauce?
Absolutely! While traditional ramen eggs use Japanese soy sauce, you can experiment. A lighter soy sauce will result in a less intense color and saltiness, while a darker soy sauce will yield a deeper hue and richer flavor. Just be mindful of adjusting any added salt if you use a very salty soy sauce.
What is the best way to peel the eggs for Ramen Eggs?
The key to easily peeled soft-boiled eggs is to use eggs that are a few days old rather than very fresh ones. Boiling them in water that already has a splash of vinegar or a pinch of salt can also help loosen the shell. Immediately plungin extractg the cooked eggs into an ice bath after boiling is crucial; this rapid cooling helps the egg contract from the shell, making peeling much smoother.
Ramen Eggs (Ajitama)
Perfectly marinated soft-boiled eggs for ramen, featuring a rich, savory, and slightly sweet flavor.
Ingredients
-
6 large egg
-
1/2 cup soy sauce (light sodium)
-
1/4 cup water
-
1/4 cup non-alcoholic mirin
-
2 tablespoons granulated sugar
-
1 teaspoon rice vinegar (optional)
Instructions
-
Step 1
Gently place the eggs in a pot and cover with cold water. If using, add a teaspoon of rice vinegar to the water. -
Step 2
Bring the water to a rolling boil, then immediately reduce heat to a gentle simmer and cook for 6 to 7 minutes for a jammy yolk. -
Step 3
Prepare an ice bath. Once cooked, immediately transfer the eggs to the ice bath to stop the cooking process. -
Step 4
While the eggs are cooling, whisk together the soy sauce, water, non-alcoholic mirin, and granulated sugar in a bowl until the sugar is dissolved. -
Step 5
Once the eggs are cool enough to handle, carefully peel them. -
Step 6
Place the peeled eggs in a resealable bag or a container and pour the marinade over them, ensuring the eggs are fully submerged. -
Step 7
Marinate in the refrigerator for at least 12 hours, or up to 24 hours for a more intense flavor. Flip the eggs halfway through marinating if not fully submerged.
Important Information
Nutrition Facts (Per Serving)
It is important to consider this information as approximate and not to use it as definitive health advice.
Allergy Information
Please check ingredients for potential allergens and consult a health professional if in doubt.